

Introduction
If you are afraid to eject from Expo Managed Workflow to Bare Workflow, this article will help you a lot.
Expo is a fantastic tool to develop React Native applications.
There are two ways you can use Expo – managed and bare workflow. The Expo team recommends using the first option at the beginning of the road.
To start with the managed workflow what developers need to know is JavaScript and a few skills in React only. All the configuration is contained in one file – app.json.
However, sometimes we encounter certain limitations and are forced to leave the managed workflow, but many developers seem to be afraid of taking this step.
So, should they eject from Expo-managed workflow?
Why using Expo instead of starting with a plain React Native project?
First, Expo development offers a lot of well-tested, consistent, and increasingly comprehensive libraries that give you access to the underlying native APIs.
Additionally, the Expo team offers battle-tested modules that are constantly maintained by them. This is a great advantage, as developers can spend more time developing instead of doing painful configure.
Expo also offers many out-of-the-box solutions such as OTA (Over The Air) updates and a push notification service.
Think of OTA – if you ever had a situation where you find typo mistakes or have to change some spacing by adding a few pixels in your app, and then you have to wait for Apple to approve a change, you’ll appreciate OTA updates a lot – as all of those small changes will appear as soon as you run the publish command.
It simply publishes a new version of the JavaScript application and updates without building a standalone app and resubmitting it to the App Stores.
Expo also contains a push notification service out of the box. It is a very important feature to notify users about, for example, sales in shops, messages from friends or incoming purchases.
All the troubleshooting with native device information and communicating with APNs or FCM are taken care of behind the scenes, so that you can treat iOS and Android notifications the same, saving yourself tons of time on the front-end, and back-end!
Let’s have a look at other advantages Expo has over plain React Native projects.
Meet Expo CLI (command line interface) and Expo Dev Tools (Web UI) – things that allow developers to install packages, run, and easily manage projects. Later on, you can run applications on different platforms (iOS, Android, Web) from dev tools.
Expo also contains a list of connected devices via QR code – enabling easy connection of physical devices. It is awesome as you can share your app with anyone, anywhere in the world while you’re working through the Expo Go app (available on App/Play Store)!

When you change the connection to tunnel mode and share your QR code with other people, they are able to run the app on their phones.
It’s a very useful tool to work with designers, for instance. They can run the app on their phones, and whatever the developer will change in the code, it appears on their devices instantly.
The reason for that is applications are built and hosted on S3. Every change in code rebuilds the app on S3 and immediately updates the app on users’ devices.
Instead of having to sign up several external testers through App Store Connect, you can easily have them download the Expo Go app and have a working version on their phone.
The last thing I would like to mention is that Expo is automatically updating our React Native to a higher version, so we don’t have to do it on our own. And please, let those who never had a problem with the RN update raise their hands first.
So with Expo, the update’s nightmare will finally disappear.
If you decide to use Expo
The Expo team suggested that we should start developing with managed workflow first.
So, What is managed workflow actually?
In the documentation we can see the:
“The managed workflow is kind of like Rails and Create React App, but for React Native.”.
Expo is really trying to manage as much of the complexity of building apps for you as it can, which is why they call it the managed workflow.
Developers that are using managed workflow don’t have to use Xcode or Android Studio, so they just write JavaScript code and manage configuration through app.json.
Isn’t that fantastic?
Building mobile apps just in JavaScript and all the configuration is managed by app.json file.
This is truly awesome, yet, just the same as everything that’s awesome, ends quickly.
Limitations of Expo managed workflows
Here’s the list:
Not all iOS and Android APIs are available
Some of the APIs are not available yet:
- Bluetooth
- WebRTC
- In-App Purchases
The SDK doesn’t support all types of background code.
For now SDK supports only geolocation (including geofencing) and background fetch. You cannot do anything with audio, controls or handle push notifications in the background.
If you need to keep your app size extremely lean, the managed workflow may not be the best choice.
iOS app 20mb / Android 15 mb size.
This is because “managed” includes a bunch of APIs – this lets you push over-the-air updates to use new APIs, but comes at the cost of binary size.
Some of the APIs that are included are tied to services that you may not be using – like Facebook Mobile SDK ,Google Mobile SDK – however, they offer many possibilities related to e.g. Auth.
Native libraries to integrate with proprietary services are usually not included in the SDK
Avoid adding native modules to the SDK if they are tied to external, proprietary services — we can’t add stuff to the SDK just because a few users need it. It increases the size of the building and the expo team is starting to think of the broader user base.
The only supported third-party push notification service is the Expo notification service.
The minimum supported OS versions are Android 5+ and iOS 10+
Updates (JS and assets) for OTA updates and builds are size-limited
Expo’s current update service supports updates of around 50 MiB.
If you met any of the limitations outlined above, it’s probably time to eject from expo managed workflow and start with the bare workflow.
It’s about time to eject from Expo managed to the bare workflow
Many JavaScript developers are concerned about ejecting from managed workflow.
They are not sure if they can handle things related to native applications, but they must remember that fear makes things look twice as bad as they are!
After running the eject command in our project this is how the terminal looks like:
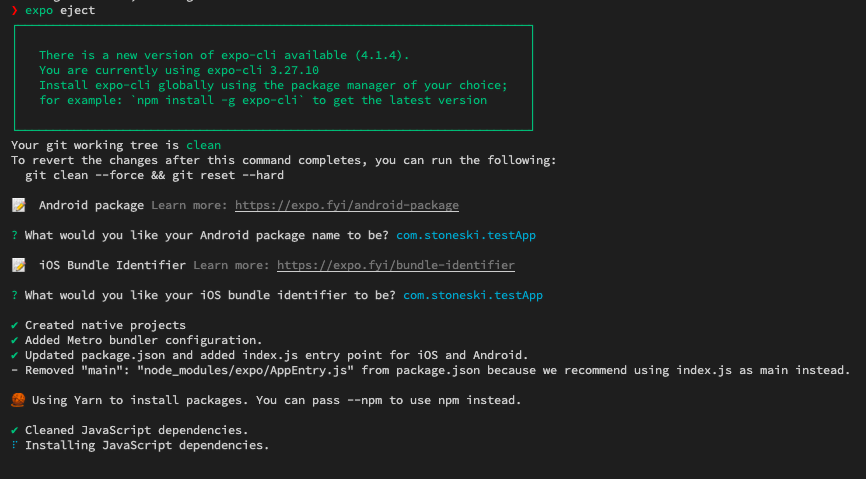
It asks about the name for android package and iOS identifier. I leave it as default values.
After the successful eject we got info like this below:

We have already changed workflow mode from managed to bare.
Take a look at the file tree. Something new has appeared.
Two new directories:
- Android – contains files that are responsible for the native part of android app.
- iOS – like in android directory, but that are responsible for iOS part.
Index file is the entry point of our app and metro.config – a JavaScript bundler used to React Native apps.

In the bare workflow we have full access to the underlying native projects and any native code. It’s a “bare” native project with React Native and one or more packages from the Expo SDK installed.
In other words, anything that you can do in a native project is possible here.
Minds that the configuration must be done on each native project rather than once with app.json
Configuring app icons, launch screen, and so on must be configured in the native projects for each platform using the standard native tooling, rather than once using a simple JSON object.
When you eject from the managed workflow, the app becomes a vanilla React Native app that includes all the Expo SDK APIs that you were using already (not more than that).
Developing app in Bare Workflow
Run and build project
Now we just have to run yarn ios or yarn android to start JavaScript bundler server and build the project binary. This requires also Xcode or Android Studio, depending on the platform.
Adding libraries from Expo SDK
Pretty much the same as in managed workflow using expo install. Additional step is to run npx pod-install to install iOS native dependency. Some of the packages require a bit of additional work with adding stuff to info.plist – iOS or android manifest files.
After that, you just need to recompile the project for both platforms.
Adding own custom native code
The process looks pretty much like in any other React Native app. It is mostly depending on docs of these packages, but usually you need to add a bit of code to files in iOS and Android directories.
Developing with Expo Go app
You can still use the Expo Go app after the eject. When you have added a native code that client doesn’t support, you just need to add guards to prevent invoking native APIs when they aren’t available.
To achieve that you can use the Constants package from Expo SDK. That package includes information about apps run on Expo App Go.
Another way is to use special files with expo extension. For example, if we use a component that renders a Map and the map library isn’t supported by Expo, you can prepare another component called Map.expo.[js/json/ts/tsx] which will be rendered in the app if you run it by Expo Go. If you run apps in a traditional way, it will just render a correct Map component.
React Native for Web app on bare project
Expo for web also works on bare projects. All you need to do here is to import one simple component into App.web.js to demonstrate it, and run expo start –web.
Workflow comparison
As you can see the differences between those workflows are very small. We can still use most of the tools. On the Expo site in their Docs we can see a table with comparison.
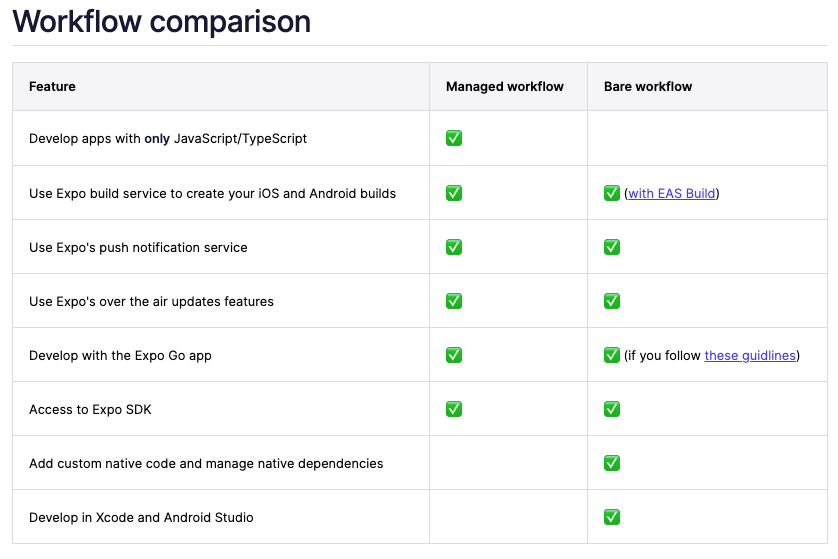
So, as you can see, most things are covered. The only difference is, in managed workflow we write just in JavaScript, but we cannot add custom native code, nor manage native dependencies, or one of the things I mentioned above in managed limitations.
Conclusion
If you choose an Expo tool to develop the next React Native project and start in a managed workflow, you don’t need to be afraid to eject from it, if you feel you have to.
The differences between them aren’t as big and as scary as it may seem. We have access to Android and iOS native modules and all we have to do is some configuration on it instead of configuring all in app.json file.
After the eject we can still use most of the things Expo gives us – Expo – SDK, CLI, Go App or OTA. So if the time to eject comes, don’t panic, bare flow is also fantastic, just like a managed way.
READ MORE
How to Publish Expo React Native App to IOS and Android
How to Eject from Expo Managed Workflow to Bare?


