Introduction
We can read in an official Strapi website- “The open-source Headless CMS Front-End Developers love”.
I wanted to experience this firsthand, so I had to get into Strapi world. In this article, I will share my insights about headless cms’, describe Strapi in detail, and few ways to connect it to any view layer.
What is Headless CMS?

A headless CMS is a content management system that allows you and members across your organization to manage and write content and access it across all your applications using an API.
The term “headless” comes from the concept of chopping the “head” (the frontend, i.e. the website) off the “body” (the back end, i.e. the content repository).
A headless CMS does not care about how and where your content gets displayed. It has only one focus: storing and delivering structured content.
Use cases for Headless CMS:
- Build a website with a technology you are familiar with.
- Websites and Web apps that use JavaScript frameworks (Vue, React, Angular)
- Websites created with static site generators (Gatsby, Jekyll, etc.)
- Native Mobile Apps (iOS, Android, Windows Phone, React Native …)
- Enrich product information on e-commerce sites.
Reasons to adopt a headless CMS solution
- Freedom from developing the legacy software of tomorrow
- Ability to easily manage content on multiple channels.
- Content management from a single place across the organization.
- Prepared for growth and scalability.
What is Strapi?
Strapi is an open-source headless CMS front-end developers love. It’s more than a Node.js Framework and more than a Headless CMS.
It saves API development time through a beautiful admin panel anyone can use.
Strapi most advantages
- Open source – free and open-source, forever. The entire codebase is available on GitHub and is maintained by hundreds of contributors.
- Self-hosted – security is crucial for companies. Host your data safely, on your own servers. GDPR compliant.
- Customizable – each project requires specific requirements. Easily customize the admin panel as well as the API.
- RESTful or GraphQL – consume the API from any client (React, Vue, Angular), mobile apps or even IoT, using REST or GraphQL.
- 100% JavaScript – one language to rule them all. Use JavaScript everywhere: both for your front-end and your Headless CMS.
- Extensible by design – plugins system included. Install the auth system, content management, custom plugins, and more, in seconds.
- Authentications & Permissions – secure your endpoints by allowing or not allowing users to access your API by role.
Alternatives to Strapi

There are quite a few alternatives to Strapi that you may be already familiar with.
Most interesting are:
- WordPress: an open-source software to build websites, blogs, and apps.
- Contentful: a modern platform to manage content in web and mobile apps.
- Netlify CMS: an open-source content management system with support for static site generators.
- Firebase: cloud service for real-time working apps.
- Drupal: an open-source content management platform for websites and apps.
How to create the first API in Strapi
Small introduction
To build a Strapi application I’ve used a tool called Docker.
I found a docker compose file which includes strapi application configuration with postgres database to store data.
Below you see a code that creates 2 containers – one with strapi app, and the second one with a database container (strapi app is using the database container).
To build an application and start developing, we only have to be in the directory where we got this docker-compose file and run a docker-compose up command in terminal.
version: '3'

services:
 strapi:
   container_name: strapi
   image: strapi/strapi
   environment:
     - DATABASE_CLIENT=postgres
     - DATABASE_HOST=db
     - DATABASE_PORT=5432
     - DATABASE_NAME=strapi
     - DATABASE_USERNAME=strapi
     - DATABASE_PASSWORD=strapi
   ports:
     - 1337:1337
   volumes:
     - ./app:/srv/app
   depends_on:
     - db

 db:
   container_name: postgres
   image: postgres
   restart: always
   volumes:
     - ./db:/var/lib/postgresql/data
   environment:
     POSTGRES_USER: strapi
     POSTGRES_PASSWORD: strapi
     POSTGRES_DB: strapi
So, if everything went good, we should see something like this:

For the first time you will be seeing a bit more info than you see on screen above, (I run that command already for the second time) so only run database and strapi container.
Next, to start managing, you should go to http://localhost:1337/admin. Try to put that into your browser. It’s a sign up page. To start developing we have to create an admin account.

After a successful login, we should be moved to the dashboard page.
Strapi has a very clear UX design and it is easy to navigate through the whole app.
There is a header where we can change language and our user settings. On left there is strapi navigation.
Therefore, starting from the top we got content types and our app models. Next to that, we can find plugins with content type builder to create new models. These are the two main things, we are going to use today.

Want to use Strapi in your project?
Content types
Adding a user
Now, let’s go to the first content type that was automatically created during build strapi app – Users

We can see an empty User table but it isn’t truth.
We have created admin user at the beginning but it doesn’t contain that record. From that view, we can add more users, so try to do that.
We have to click Add New User button:

Now, we are going to create an entry page where we can create a new user record.
We can see username, email, password string fields and also confirmed and blocked boolean fields.
As you can see on the right side, there is a “roles” field, which is a relation field. It is a select field with two values: public and authenticated. We will try to add new user, so fill all the fields and click the green Save button.

We are again on User table page, and we can see the latest added user.
Adding and editing records
From that view we can add new records or edit the existing one. It is very easy for non-technical people to manage the application. They don’t have to write the code like developers. Instead, they can create data shapes only by clicking in the dashboard.
Ok. Finally, we have added a new user to the existing content type.
Next, let’s create new content type. We can do that by using Content Type Builder.

There are 3 content types in our app for now. The User content type we saw in navigation menu, and two more – Permission and Role (every strapi app created from the scratch got these content types).
However, In this article we won’t go deeper into it.
Creating a new model
I suppose, a better option will be to create a new model.
Let’s assume we are creating a headless cms for blog, so we will try to add Post content type.
So, by clicking “create new content-type” we move to form:
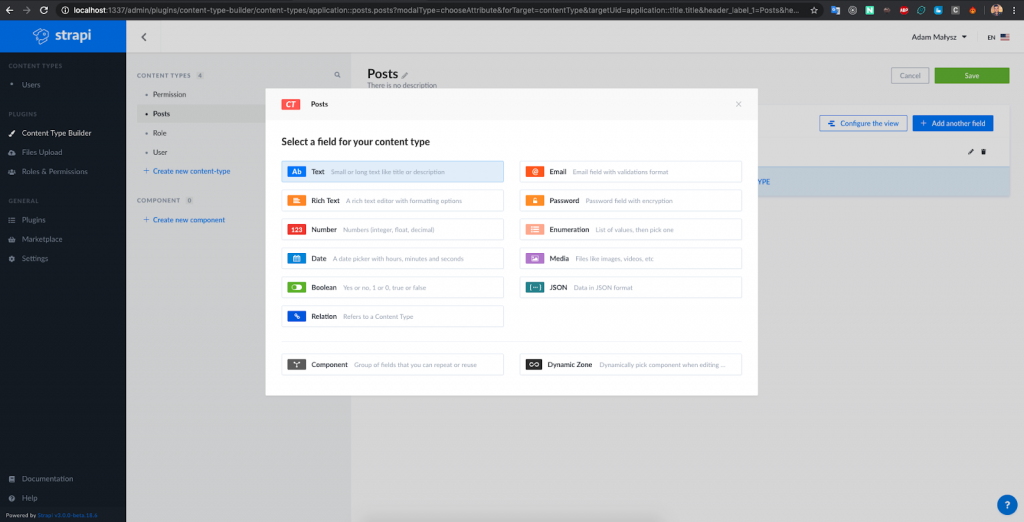
We can see a modal where we can pick the type of field we want to add to our new model.
After we choose, for example, text field, the next step is adding the name to that field and choosing more specific text field type – short text or long text.
Every post got the title and in most cases it is short text.
So we added this field into our Post model. Next, I have also added content field as a rich text type, short description field as a long text, and User relation field, so any user can have many posts.
So our Post model looks like:

Then we can move to our Post model, which will appear at the top of navigation:

In the next step we will create an exemplary post that later can be displayed on our blog.
Adding posts
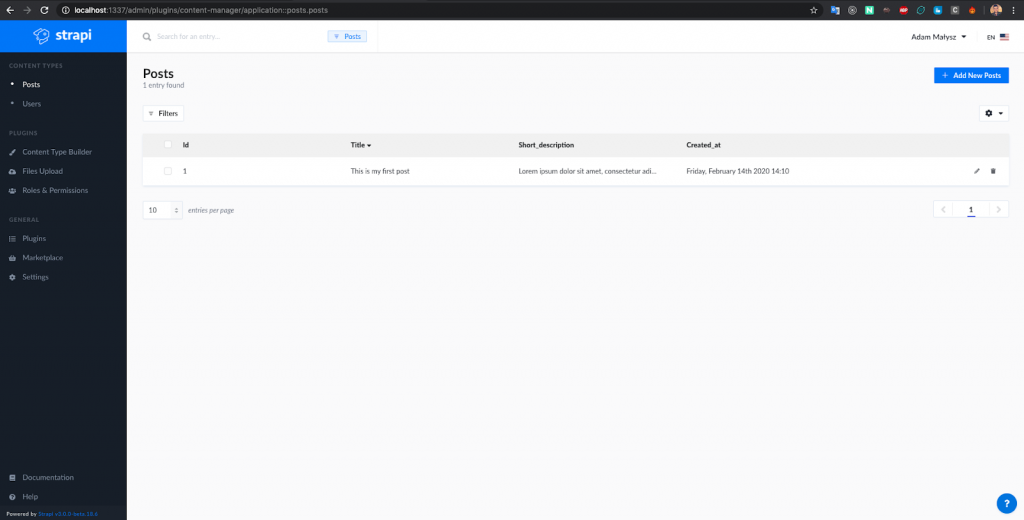
Just like in the User model, we should hit the “Add New Posts” button.

We have to fill all the fields chosen when we built a post model.
So, add a post title, content, short description, and select a post’s author.
After that, let’s save our first post – it will be automatically added to the database. If everything went good, we will see our post on the list.
If we have any data in our strapi application (post assigned to user), we can use it to be displayed on the frontend – in our case Gatsby blog.
To make that happen, we need to do one more thing – We have to change permission to models, which we want to get by api.
In navigation, we should go to roles and permission page. We can see a content with some tabs. We need the first, displayed immediately after we enter the site. Try to edit the authenticated option by clicking on the pencil icon.

After moving to editing section, we can see a form with fields we can edit.
The one we need is Permission section. We have to allow developers fetch data about posts.
Mark the find checkbox related to the Post model. After that, save your choice.

We have to do the same thing for Public. Go to the edit and mark find option related to the Post model.
This is a basic example done for the article. In real application you have to be careful with permission settings (for example adding create or edit role only for authenticated users).
Creating Gatsby Apllication
So I am creating a common classical gatsby application, but I won’t be going too much into details, I will only show the things related to fetch our strapi data to gatsby and display it.
First, we have to add a gatsby plugin, which will magically connect strapi and gatsby together.
The plugin is called ‘gatsby-source-strapi’. We should use npm or yarn to install it like a normal npm package inside gatsby project directory.
After that, go to the gatsby-config.js file and add plugin.
There is a code below:
{
     resolve: 'gatsby-source-strapi',
     options: {
       apiURL: 'http://localhost:1337',
       contentTypes: [
         'post',
       ],
       queryLimit: 1000,
     },
   },
In options you need to add apiUrl (in our case it is http://localhost:1337), and contentTypes. There are models which we want use.
Run our gatsby application and try to get data via graphQL. You should go to in-browser IDE and explore data and schema. I have built app on port 8000 so use url: http://localhost:8000/___graphql
We Need to create query to get posts and fields, that we need to display to all blog users.
This is an example of query and its response:

Let’s create a basic react components, in this case articles list:
import React from 'react'
import { graphql, Link } from 'gatsby'

import Layout from '../components/layout'
import PostsListStyled from '../components/styles/PostsListStyles'

const BlogPage = ({ data }) => {
 const { edges: posts } = data.allStrapiPost

 return (
   <Layout>
     <PostsListStyled>
       {posts.map(({ node: post }) => (
         <li key={post.id}>
           <Link to={`/blog/${post.id}`}>
             <h1>
               {post.created_at}: {post.title}
             </h1>
             <p>{post.short}</p>
             <p>by {post.user.username}</p>
           </Link>
         </li>
       ))}
     </PostsListStyled>
   </Layout>
 )
}

export default BlogPage

export const pageQuery = graphql`
 query {
   allStrapiPost {
     edges {
       node {
         id
         title
         content
         created_at(formatString: "YYYY-MM-DD")
         user {
           username
         }
         short
       }
     }
   }
 }
`
If everything went well, after running gatsby blog, we should see a listing.
Let’s check it.

Everything seems to be working correctly.
It is exactly the same data we have saved in our strapi cms.
Next step will be creating an article page. That is an example of basic component page implementation:
import React from 'react'
import { graphql, Link } from 'gatsby'
import Layout from '../components/layout'

const Template = ({ data }) => {
 const { strapiPost: post } = data

 return (
   <Layout>
     <Link to="/blog">Back to the list</Link>
     <div>
       <h1>{post.title}</h1>
       <h2>{post.created_at}</h2>
       <h2>{post.user.username}</h2>
       <img src={post.image.childImageSharp.original.src} />
       <div dangerouslySetInnerHTML={{ __html: post.content }} />
     </div>
   </Layout>
 )
}

export default Template

export const query = graphql`
 query ArticleTemplate($id: String!) {
   strapiPost(id: { eq: $id }) {
     title
     content
     created_at(formatString: "YYYY-MM-DD")
     user {
       username
     }
     image {
       childImageSharp {
         original {
           src
         }
       }
     }
   }
 }
`
One more thing. Making createPages function in gatsby-node file.
It is necessary to our graphQL query for Template component to work correctly.
This is the code you have to add to gatsby-node:
exports.createPages = ({ actions, graphql }) => {
 const { createPage } = actions;

 const getArticles = makeRequest(graphql, `
   {
     allStrapiPost {
       edges {
         node {
           id
         }
       }
     }
   }
   `).then(result => {
   // Create pages for each article.
   result.data.allStrapiPost.edges.forEach(({ node }) => {
     createPage({
       path: `/blog/${node.id}`,
       component: path.resolve(`src/templates/post.js`),
       context: {
         id: node.id,
       },
     })
   })
 });

 // Query for articles nodes to use in creating pages.
 return getArticles;
};
Build Gatsby blog again and check results of our hard work:

Conclusion
Strapi is a fantastic powerful tool for creating CMS without a head to our applications.
Headless approach (thanks to the possibility of using data through many applications) makes us free from using one specific technology and enables us to use any of the newest ones.
We don’t need to know any backend language to write it. We can just click and use it in our business easily.
It is also a great tool for frontend devs, they can quickly make an API to their frontend applications and use it even to learn new technologies.
It provides us with a full range of other possibilities. I hope the above article will encourage you to try it out, and start the new adventure with strapi.
Want to use Strapi in your project?