

The Problem
While building the Jamstack website, we use Gatsby to be our static page generator, and Storybook to develop and test website components.
We wrote an article on what is Jamstack, if you’re wondering!
Our git repository is hosted on GitLab and usually, our production versions of websites are hosted on Netlify. We’ve been also using free Netlify packages for development purposes.
However, when our Gatsby projects portfolio grew, we couldn’t use free Netlify anymore, due to extending monthly build times.
This is why we wanted to find an option to limit Netlify cost for development instances.
After further investigation we’ve found that GitLab Pages could be a great solution for hosting Gatsby and Storybook.
and in this post you can check how we’ve resolved our problem.
We hope you will benefit from it.
Benefits of hosting Gatsby & Storybook on GitLab Pages
Hosting Gatsby and Storybook on GitLab Pages allows us to:
- set up an automatic deployment & build process without using extra tools (often paid) like DeployBot or CircleCI
- close to zero effort continuous development of test/production static sites
- stop using third-party hosting services to host Gatsby Pages, which will:
- allow us to host static pages cost-free
- no longer require us to register on any platform just to host a static site
- no longer require us to waste our time on configuring extra services
- allow any team member to configure deployments (the configuration is just a piece of cake for anyone)
- use GitLab-provided or our own domain on our static website
- protect our static site with a GitLab authorization (GitLab user/password) for free (unlike Netlify password protection)
- keep all of our projects in one place, which makes us rely only on one service
- trace our deploy jobs and see the build process live
- add any kind of Job based on webhooks (like Slack notifications, deployment of another environment etc.)
- use free SSL certificate provided by GitLab if using GitLab’s domain
Need assistance with Gatsby project?
Hosting Gatsby & Storybook on GitLab Pages step-by-step
1. Add Path Prefix to Gatsby
In the gatsby-config.js, set the pathPrefix to be added to your site’s link paths.
module.exports = {
  pathPrefix: `/examplerepository`,
}(examplerepository is a repo’s name – e.g. for https://gitlab.com/pagepro/sample it will be sample)
2. Create a .gitlab-ci.yml file
Create a .gitlab-ci.yml file in repo root directory and fill it like this: (this file must be on master branch)
image: node:12.10.0
cache:
  paths:
    - node_modules/
    - .cache/
    - public/
pages:
  script:
    - yarn
    - yarn build --prefix-paths
    - yarn build-storybook
  artifacts:
    paths:
      - public
  only:
    - master
where:
- image: node:12.10.0 is the Node JS version (you can also use something like image: node:latest) – but it’s recommended to set a version more specific than
latesthere. Otherwise, builds can fail after Node JS update!
- cache: … – leave this as is (public/ has to be the same as in pages/artifacts/paths)
- pages:
- script: – those are shell scripts that will be executed after deploy – this is where we trigger build:
- yarn – install dependencies (can be npm install etc)
- yarn build – build ./public directory with static Gatsby site
- yarn build-storybook – optional build for Storybook. If you’re using Storybook, you have to set the Storybook’s output path in package.json Storybook’s build script. It should look like this:
- “build-storybook”: “yarn build-storybook -c .storybook -o public/storybook“
- artifacts: – those are files that will be built and cached on the server. Those will be available to download – leave as is for Gatsby
- only: – this is a branch name, which will trigger deploy & build to GitLab Pages after detecting changes – you can switch to any other (e.g. develop)
- script: – those are shell scripts that will be executed after deploy – this is where we trigger build:
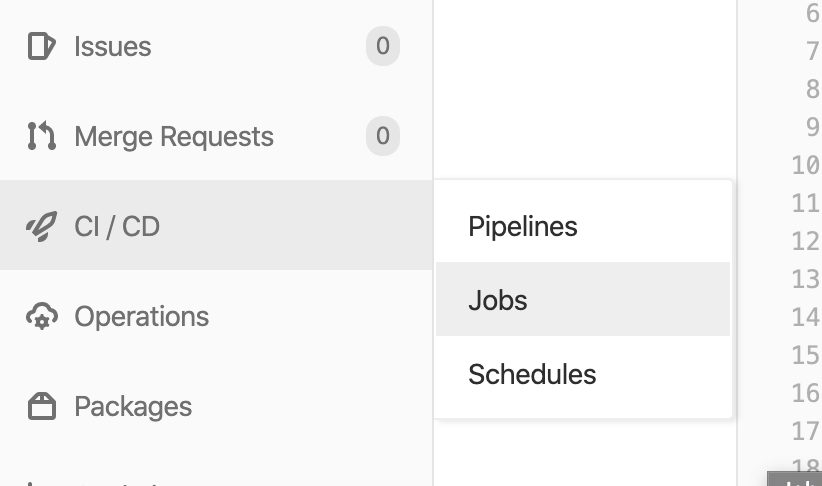
3. Push to your branch
Push to your branch (master in this case) and watch if a Job is triggered – you can preview jobs here:
4. “Passed” badge
If everything went good, you should see passed badge in Jobs list:

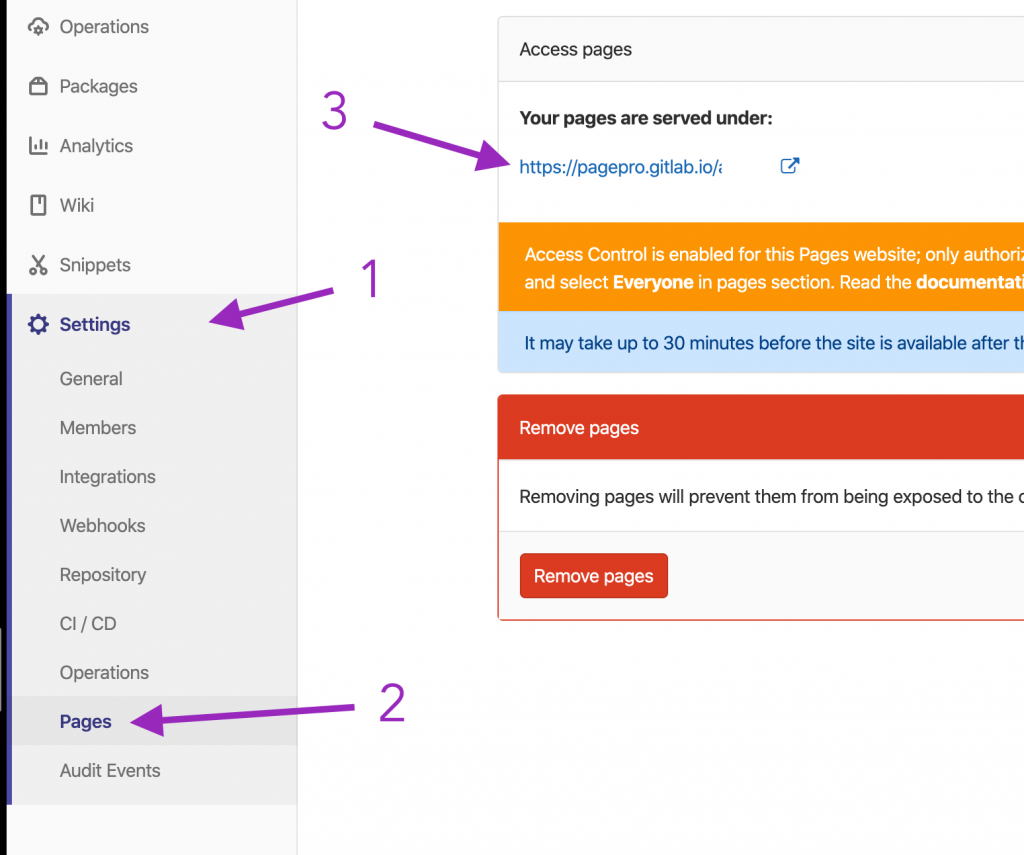
5. Go online and public
Your page should be available online after max. 30 minutes, the address should be visible here:

If you’re using Storybook, {link}/storybook would be your Storybook URL – as we’ve set this in package.json.
If you want the page to be public, you should go to Settings > General > Visibility and change visibility settings for Pages.
How to host static Front-end site on GitLab Pages?
1. Create a .gitlab-ci.yml file
image: node:8.12.0

pages:
    stage: deploy
    script:
      - cd ./page
      - yarn
      - yarn build
      - cd ../
      - cp -R ./page ./public
    artifacts:
      paths:
        - public
    only:
      - develop
where:
- image: node:8.12.0 is for Node JS version (you can also use something like image: node:latest) – but be aware that NodeJS update can break your site!
- pages:
- stage: deploy – leave it as is – this is our Job’s name
- script: – those are shell scripts that will be executed after deploy – this is where we trigger build:
- cd ./page– your project subdirectory (only if the static files are in subdirectory)
- yarn – to download dependencies (you can use any other command, like npm i)
- yarn build – static files for production (or any other command, regarding the tech stack)
- cd ../ – to go back to root dir (only if the static files are in subdirectory)
- cp -R ./page ./public – to copy compiled files to ./public directory (GitLab Pages forces us to use ./public directory for generated static files)
- artifacts: – those are files that will be built and cached on the server – it’s recommended to leave it as is
- only: – this is branch which (after merge/push) will trigger deploy & build to GitLab Pages – you can switch to any other (e.g. master)
2. Push to branch
Push to your branch (develop here) and watch if a Job is triggered – you can preview jobs here:

3. “Passed” badge
If everything went good, you should see Passed badge in Jobs list:

4. Go online
Your page should be available online after max. 30 minutes, the address should be visible here:
If you want the page to be public, you should go to Settings > General > Visibility and change visibility settings for Pages.
Wrap up
I think I will just keep GitLab Pages to host Gatsby and Storybook.
It showed me there are better and cheaper ways than just using hyped Netlify.
As you can see, it’s not even that hard once you do it and I hope you found it helpful, just as much as I did.


