

TL;DR
• Google PageSpeed Insights evaluates website performance and provides recommendations to improve loading speed, user experience, and Core Web Vitals metrics.
• Websites built with Jamstack often achieve better performance because most content is pre-rendered and delivered as static files.
• Next.js helps improve performance by supporting static generation, optimized assets, and modern rendering strategies.
• Optimizing images, reducing JavaScript bundle size, and improving caching strategies are key steps to achieving higher PageSpeed scores.
• Using a Jamstack architecture with Next.js can significantly reduce server response times and improve overall page loading performance.
• Understanding PageSpeed metrics and applying modern frontend optimization techniques helps teams build faster, more efficient web applications.
Why Does Improving Google Page Speed Matter?
You might not be aware of which page elements are slowing down your Next.js page. Checking a website’s performance through a regular speed test will not give you the same full overview as Google PageSpeed Insights, a free tool you can use to measure the speed index and load time of web pages. It calculates the Core Web Vitals data and combines it with insights from Lighthouse, offering an estimate of your website’s performance through a score between 0 and 100. A score above 90 points is a perfect score for site speed. In this article, we’re going to take a look at what a Next.js developer can do to improve Google PageSpeed Insights score.
Website Performance, Bounce Rate & Other Marketing Metrics
The main reason to improve your Google PSI score is user experience, which also affects your search rankings. If you want a website to rank higher in Google search, focus on page speed and performance before SEO optimization. Pagespeed score affects Search Engine Optimization as well. A slow page won’t attract users and will rank low in search engine rankings.
We encourage developers to think broadly about how performance affects a user’s experience of their page and to consider a variety of user experience metrics. Although there is no tool that directly indicates whether a page is affected by this new ranking factor, here are some resources that can be used to evaluate a page’s performance.
Zhiheng Wang and Doantam Phan about “The Speed Google Update”
1. Avoid Unnecessary re-renders
React is pretty fast, but it can get slow if there are lots of unnecessary re-renders. Re-renders can block the main thread causing INP and LCP to increase.
Get Rid of Unstable References
The most common cause of these re-renders is unstable references to objects or functions. If a parent component passes an unstable reference to a child component, the child component will re-render every time the parent component re-renders, even if it’s wrapped in React.memo.
const ChildComponent = React.memo(({ id, name, onClick }) => (

  <div>

    Hello, {name}! ({id})

    <button onClick={onClick}>Say Hello</button>

  </div>

));

const ParentComponent = () => (

  <ChildComponent

    user={{

      id: "123",

      name: "John Doe",

    }}

    onClick={() => console.log("Hello, John Doe!")}

  />

);
This is because when the ParentComponent re-redners it creates a new user object and a new onClick function and passes them to the ChildComponent. Since the references are now different, the child component will re-render. To fix it we need to stabilize the references by using useMemo and useCallback hooks.
const ParentComponent = () => {

  const user = useMemo(

    () => ({

      id: "123",

      name: "John Doe",

    }),

    []

  );

  const handleClick = useCallback(() => console.log("Hello, John Doe!"), []);

  return (

    <ChildComponent

      user={user}

      onClick={handleClick}

    />

  );

};
Now, the ChildComponent will not re-render when the Parent component re-renders. One thing to note is that if the object or function does not depend on any prop nor state of the component, it’s better to move it out of the component instead of memozing it.
Keep the State as Deep in the Components Tree as Possible
Since we know that components re-render when their parent component re-renders, we can spot another common issue that causes many re-renders – keeping the state high in the component tree.
Suppose we have the following Layout component:
const Header = ({ isNavigationOpen, toggleMenu }) => (

 /* The code of the header */

);

const Layout = () => {

  const [isNavigationOpen, setIsNavigationOpen] = useState(false);

  return (

    <>

      <Header

        isNavigationOpen={isNavigationOpen}

        toggleMenu={() => setIsNavigationOpen(currentValue => !currentValue)}

      />

      <BigExpensiveComponent />

    </>

  );

};
Opening the menu is triggered by a state change which in turn causes the Layout component to re-render which causes all of its children to re-render as well, including the BigExpensiveComponent.
The solution is easy – move the state to the header, that way opening the navigation will only cause the header itself to re-render.
How to Detect Unnecessary Re-Renders
- React-devtools – Allows you to check how many times each component re-rendered as well as why and how long it took.
- React-scan – Does exactly what dev tools do, but is available through CLI and displays the re-renders in a nicer way
React-Compiler
Recently the React team has released a beta version of React Compiler that performs memoization automatically, meaning you don’t have to worry about useMemo, useCallback, and React.memo at all. Even though it’s in beta, multiple people have reported successfully using it in production. They’ve even released a package that allows to use the compiler with React 17, 18, and 19.
2. Bundle Size
The size of the bundle directly affects page speed. The bigger the bundle, the more data needs to be transferred over the network which increases the load time, especially on slower networks. Larger bundles also take more time to be parsed and run, which is especially visible on mobile devices.
The first step in reducing the bundle size is to review the libraries used in the application. Often a whole library is installed only for a single function that could’ve been easily created within the app’s code or copied from the library (provided the license allows that).
The second step is to check whether there’s another library that covers all our use cases but has a smaller bundle size. An example could be replacing moment.js with date-fns which is a quarter of moment’s bundle size, not counting the tree-shaking.
Identifying Bundle Size
How can we identify which libraries have the biggest bundle sizes? There’s a dedicated package based on a webpack-plugin – Bundle Analyzer.
Running the tool will create and open three HTML files, one per runtime environment (Node, Edge, and client). Once the html file is opened, we can see a treemap of every chunk in our app and what it consists of making it easy to find the heaviest libraries.
One more benefit of this tool is that spot code that is not necessary or should not be sent to client like server code. For example, we might have an axios client that we use in API routes, if we accidentally import a file that directly/indirectly imports the axios client we may end up with axios being included in the client’s bundle. This is also a security issue as we might import sensitive data like API keys or URLs.
Similarly, having one big file with all of the utils we use throughout the project might not be the best idea since importing one of them will include the whole file in the bundle.
3. It’s Not Only JavaScript
All of our examples related to the amount of JavaScript being parsed and executed, but it’s not the only cause of poor LCP or INP scores. Reflows are the leading cause of those outside of JavaScript.
Reflow (or layout recalculation) occurs when the browser calculates the layout of the web page. This happens when changes are made to elements that affect their size, position, or the overall structure of the document as well as querying certain properties, like offsetHeight, clientWidth, and so on, that force the browser to recalculate the layout. To simplify – reflow is a synchronous and main thread blocking operation that computes dimensions and positions of elements in a document.
These calculations are expensive and when done synchronously can block the main thread for a long time. I’ve recently reduced the INP of a website from 208ms to 175ms by removing reflows that happened in the first seconds after the page has loaded.
How to Get Rid of Reflows?
It’s important to note that not all reflows can be avoided, so we should aim to have as little of them as possible. Some of the reflows can be fixed by reading the values asynchronously. For example instead of calling element.getBoundingClientRect, we can use the IntersectionObserver. The observer’s callback parameter contains the observed entries and each entry has a boundingClientRect property that we can use.
I created a util that wraps the observer in a promise, making it easier to use:
const fastMeasure = <T extends Element | Element[]>(

  elements: T

): Promise<IntersectionObserverEntry[]> =>

  new Promise<IntersectionObserverEntry[]>((resolve) => {

    const elementsArray = Array.isArray(elements)

      ? elements

      : [elements];

    if (elementsArray.length <= 0) {

      resolve([]);

    }

    const intersectionObserver = new IntersectionObserver(

      (entries) => {

        intersectionObserver.disconnect();

        resolve(entries);

      }

    );

    elementsArray.forEach((element) =>

      intersectionObserver.observe(element)

    );

  });
As for writes, they will almost always trigger a layout, this is fine, but there are some things to remember – you should always read the values before writing them. This is because when JavaScript runs, all of the values from a previous frame are known and can be queried. If you modify the value and then try to read it, it will force the browser to perform the layout earlier causing something called forced synchronous layout.
Forced Synchronous Layout

The image above shows the order of tasks required to ship a frame. As you can see, Javascript runs before the style and layout calculations. Modifying the value prior to reading it forces the browser to call perform the layout earlier. This is an expensive operation that blocks the main thread.
Doing the above a lot of times in quick succession is even worse and causes something called layout thrashing. Here’s the example:
function resizeAllParagraphsToMatchBlockWidth () {

  // Puts the browser into a read-write-read-write cycle.

  for (let i = 0; i < paragraphs.length; i++) {

    paragraphs[i].style.width = `${box.offsetWidth}px`;

  }

}
box.offsetWidth will be read every before it’s written to paragraphs[i].style.width this will cause the browser to to apply the style changes and run layout on the next iteration loop, essentially “thrashing” the layout since it will be discarded on every loop iteration. This is why it’s important to batch the reads and writes together. There’s a handy library called FastDOM that automatically batches reads and writes.
In the project I mentioned earlier I was doing reads and writes (setting css variables) in various hooks causing a lot of reflows and layout thrashing, hence the poor INP score. The solution was to combine all of the hooks into one that does everything. I’ve also used the aforementioned FastDOM to batch the reads and writes. This has cut the time spent on layout by over 70% as now only one reflow was triggered.
But not only Javascript can trigger a reflow, here’s a list of CSS properties that trigger a reflow. We have to be careful when doing animations and avoid using properties from this list.
I’ve recently noticed that a skeleton animation I’ve been using throughout my project has been triggering a reflow on every iteration (!). This is because it was modifying background-position, the solution was easy. I’ve used transform to move the background instead – no more reflows caused by that animation.
As mentioned earlier, we can’t avoid some reflows. What we can do is reduce the amount of work the browser has to do to calculate the layout.
Content-visibility
The content-visibility CSS property allows the browser to skip an element’s rendering work, including layout and painting until it is needed. This is useful when we have a lot of DOM elements, which correlates with higher reflow times.
Setting the content-visibility to auto will make the browser decide when the element should be rendered. We can (and should) provide contain-intrinsic-size, the browser will reserve this much space for the element before it is rendered, otherwise, the scrollbar will shift.
Put the Elements in Their Own Layers
Browsers often try to break up elements into separate layers. You can calculate layout and paint more efficiently as the browser doesn’t have to account for elements outside of the element’s layer. Sometimes they might not be able to recognize that an element could be in a separate layer. Luckily, we can do it ourselves by using one of the following CSS properties:
will-change: transform

transform: translate3d(0,0,0)

transform: translateZ(0)

backface-visibility: hidden
Please note you should used these sparingly. Too many layers can hurt the performance more than it can help, especially on slower devices.
4. Avoid CSS-in-JS
While using CSS-in-JS libraries can be tempting: it lets you have everything as components, the ability to pass props, and stores values in javascript variables. However, it does cause some performance issues. First of all, there’s a runtime overhead since the library has to serialize the styles and add them to the document – this has a direct impact on LCP. They also increase the bundle size in contrast to pure CSS solutions that add nothing to the bundle. Inserting new CSS rules also makes the browser do extra work that it wouldn’t need to do had we used a classic CSS solution.
Tailwind is a great alternative. It’s really easy to use, has a great dx, suffers none of the aforementioned issues, and having a single CSS file is much more performant. Another benefit is that Tailwind has a compilation step that extracts only the classes used within the project, so the size of the generated CSS file is as low as possible.
Next.js team has recently added an experimental inlineCSS flag that allows you to inline the CSS file generated by Tailwind, further improving LCP and FCP – all we need to do is wait for it to become production-ready.
5. Reduce the Amount of Javascript Executed on the Load
One of the most common issues with Next js apps reported by the Lighthouse is high JavaScript execution time. To understand how to fix it, first, we have to understand how Next js works.
When a new page is being built on the server, Next runs our code to generate a static HTML page. It’s then served to the client along with the JavaScript bundle (asynchronously of course).
Thanks to this, the user sees the content of the entire page almost immediately. The page is not interactive just yet though, the process of making it interactive is called hydration. Hydration connects the code with the server-generated HTML. It re-renders the web application in a way like a regular React app would. The code ran during the server-side render is then run again on the client side, though not all of code has to be.
So, what’s the solution? Do as much computation server-side as you can.
A good example would be parsing the CMS API responses to React component props. Let’s say that a section consists of tiles, each tile has an image, a title, and a link. It may be tempting to pass the whole API response representation of that section as props of the component and parse it in a hook. However, then that hook would run both on the server and the client. Still, the output would be the same.
Solution
Instead, we should move the parsing logic into the getStaticProps and pass the result as props to the component:
export const useTiles = (data) => {
 const { tiles } = data;

 return tiles.map(({ id, title, image, link }) => {
   // Extracts and computes the necessary fields from the image object
   const imageData = getImageData(image);
   // Extracts and computes the necessary fields from the link object
   const linkData = getLinkData(link);

   return {
     id,
     title: title ?? "",
     image: imageData,
     link: linkData,
   };
 });
};
A hook transforms the API response with the following command:
export const TilesSection = (props) => {
 const { data } = props;

 const tiles = useTiles(data);

 return (
   <section>
     {tiles.map((tile) => (
       <Tile key={tile.id} {...tile} />
     ))}
   </section>
 );
};
The component uses the transformed data to render the UI.
And here’s an example of a better implementation:
export const getTilesSectionProps = (data) => {
 const { tiles } = data;

 return {
   tiles: tiles.map(({ id, title, image, link }) => {
     // Extracts and computes the necessary fields from the image object
     const imageData = getImageData(image);
     // Extracts and computes the necessary fields from the link object
     const linkData = getLinkData(link);

     return {
       id,
       title: title ?? "",
       image: imageData,
       link: linkData,
     };
   }),
 };
};
Extract the transformation logic to a function with the following code:
export const getStaticProps = async () => {
 /* Code for fetching the page */

 const pageData = /* extracted page data */

 return {
   props: {
     ...pageData,
     sections: pageData.sections.map((section) => {
       switch (section.type) {
         case "tilesSection":
           return getTilesSectionProps(section);

       /*
           cases for all other sections
       */

         default:
           return section;
       }
     }),
   },
 };
};
Replace the API response of the section with the props of the component using the previously created function.
Need help in improving your pagespeed?
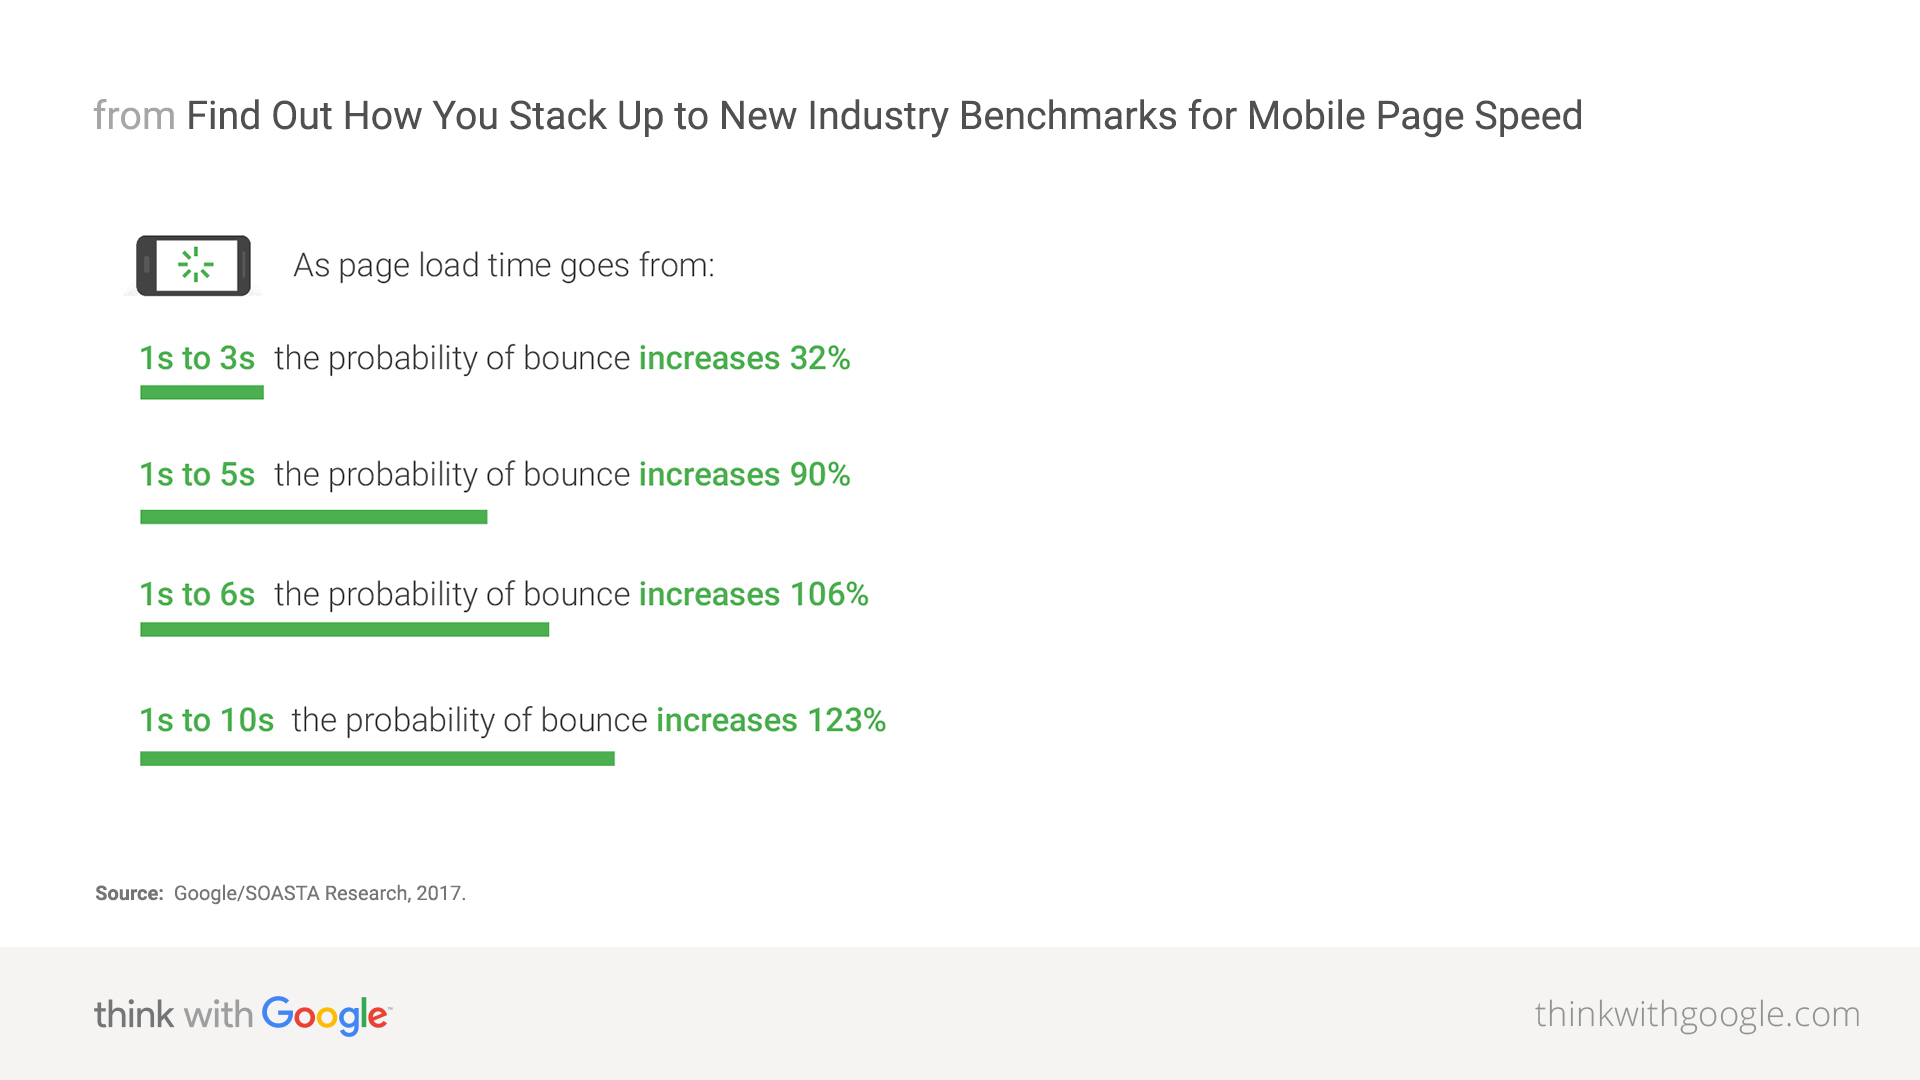
6. Include Lazy Load Images
Loading times of images on your page have a huge impact on the Google PageSpeed Insights results. It’s key to optimize your Core Web Vitals assessment scores and minimize the bounce rate. To do that, page load time should be as short as possible.
Images are some of the most notorious page speed killers, and that’s why it’s important to handle them properly. The most common mistake is loading the images all at once instead of lazy loading.
Lazy loading downloads images only when they approach the current screen’s view. For instance, the browser won’t load an image at the bottom of the page until the user scrolls down to it, saving time. Next js comes with a built-in component called Image, that implements lazy loading (and more) by default.
Example usage of the image component:
<Image
 src="author.png"
 alt="Picture of the author"
 width={500}
 height={500}
/>
7. Use the Latest Image Formats, Use Changing Size
The size of an image differs based on its format. A PNG image weighs more than a JPG but its quality is much better. Creators have developed new image formats like WebP and AVIF, which combine great quality with low size and so they load quickly, specifically for the web to optimize resource usage.
When using the Next js image component, we can define a loader and append query params that will make the provider convert the image to one of the aforementioned formats. This alone will help improve Google PageSpeed Insights score.
Since images on modern static websites are usually provided by the user in the CMS, it’s not possible to have all of them in one of these formats. The solution is to use Image Optimization cloud providers like Imgix (or use the built-in one provided by Next.js).
Some CMSes like Sanity come with image optimization built-in
Quick poll
What is your Google PageSpeed Insights score?
Optimize the Size of Your Images and Improve Load Times
It’s important to size the images properly. Say we have a huge image, 4036x1024px for example. Unless the user has a 4k display, the extra pixels won’t make a difference, apart from increasing page load. Not exactly what we want.
This effect is even more magnified on mobile devices because of smaller screens, and lower CPU and network performance. Mobile versions have usually a much lower site speed. This is where srcsets come in. It’s a way to tell the browser which image it should load for the given screen width. Combining it with the aforementioned image optimization cloud providers yields great results for your page’s performance.
Luckily, when using Next js we don’t have to do it manually – the Image component will do it for us. Using the loader function, Next will generate a srcset using the default value of the config file’s imageSizes property. We can also provide our own sizes.
An example of a loader used with Sanity CDN:
const loader: ImageLoader = ({ src, width, quality }) =>
 `${src}?w=${width}&q=${quality || 75}&auto=format&fit=max`;
An example of usage of the loader:
<Image
 loader={loader}
 /*
 * the rest of the props
 */
/>
8. Lazy Load Scripts
Modern static websites often include third party scripts like Google Tag Manager, cookie consent managers, newsletter pop-ups, and other tools, which can tank your page speed.
Some of them have a great impact on loading site performance and can reduce the user experience drastically, especially if they are render-blocking or delay page content from loading .Running too many scripts can cause even the most optimized website to score poorly in a Google Pagespeed Insight test. If you’re trying to reach a perfect page speed score, time to downsize.
Not all of those scripts have to load immediately. For example, showing the cookie consent banner or newsletter pop-up a few seconds (5-10) after the user visits the site won’t hurt the user experience. Quite the opposite – it will greatly increase the lighthouse performance score (thus increasing the user experience).
To achieve this we can utilize Next’s built-in Script component. Currently, it offers four different loading strategies to achieve this:
beforeInteractive – load before the page is interactive
Injecting a script into the initial HTML from the server allows it to run before the self-bundled JavaScript executes. Use this strategy for any critical scripts that need to load and execute before the page becomes interactive.
Scripts that typically require this loading strategy include bot detectors and third-party libraries that must load before the JavaScript code runs. Remember, you can apply this strategy exclusively to scripts within the Next.js custom document component.
afterInteractive – load immediately after the page becomes interactive
Scripts using the afterInteractive strategy are injected client-side and will run after hydration. This is a great strategy for scripts that should run as soon as possible, but don’t have to do so before executing the JavaScript bundle. A perfect solution for tag managers and analytics.
lazyOnload – load during idle time
The lazyOnload strategy loads scripts during the idle time after the browser has fetched all other resources. This approach suits low-priority scripts that don’t require immediate execution, such as chatbots, cookie consent managers, or newsletter pop-ups.
worker – load in a web worker
This is the latest feature of web development. Scripts utilizing the worker strategy are executed in a web worker using Partytown.
This allows us to offload the work from the main thread to a background one. One of the most common issues reported by Lighthouse is high main thread load, Partytown is a promising solution for that.
However it is still an experimental feature since the library itself is still in beta. That doesn’t mean we shouldn’t use it, but we have to be cautious. I have successfully used it with Google Tag Manager and some cookie consent managers.
9. Utilize Code Splitting to Improve Your PSI Score
Let’s say our web application contains fifty different sections. Usually, there is a single Sections component that takes an array of sections. Based on their type it renders them using corresponding components.
The problem with such a solution is that we’re always loading all of our sections into our bundle even though our page may only use a couple of them.
The old, inefficient way:
import Section1 from "@sections/section1";
import Section2 from "@sections/section2";
/*
* ...
*/
import Section49 from "@sections/section49";
import Section50 from "@sections/section50";


export const Sections = (sections) => {
   return sections.map((section) => {
       switch (section.type) {
       case "section1":
           return <Section1 {...section} />;

       case "section2":
           return <Section2 {...section} />;

/*
* ...
*/

       case "section49":
           return <Section49 {...section} />;

       case "section50":
           return <Section50 {...section} />;

       default:
           return section;
       }
   });
}
Luckily, next.JS Provides Us With a Useful Tool Called Dynamic. It takes a function that returns a dynamic import of a component and returns a component that wraps the imported one.
We can use the returned component just as we would use the imported one. The difference is that now the code of that component will be put in a separate bundle and will be downloaded only when the component has been mounted.
If a page consists of four sections, only the code of four components will be included in the bundle, greatly reducing its size and improving the page speed rating.
To improve Google PageSpeed Insights score, try the new, optimized way:
import dynamic from "next/dynamic";

const Section1 = dynamic(() => import("@sections/section1"));
const Section2 = dynamic(() => import("@sections/section2"));
/*
* ...
*/
const Section49 = dynamic(() => import("@sections/section49"));
const Section50 = dynamic(() => import("@sections/section50"));

export const Sections = (sections) => {
 return sections.map((section) => {
   switch (section.type) {
     case "section1":
       return <Section1 {...section} />;

     case "section2":
       return <Section2 {...section} />;

     /*
      * ...
      */

     case "section49":
       return <Section49 {...section} />;

     case "section50":
       return <Section50 {...section} />;

     default:
       return null;
   }
 });
};
10. Optimize SVGs (Img Src vs SVG Markup)
SVG images are often used for the site’s logo in the header or as icons in different sections of a typical website. Unfortunately, when a user uploads an SVG image to a CMS, the image is returned as a link to a CDN instead of the markup. Let me give you a couple of examples of why this might be an issue:
If you have a section with a list of features, each of them has an icon and some text associated with it. Having 10 features means 10 extra requests for those icons. It lower our lighthouse performance score, and result in a poor user experience. The user doesn’t want to see placeholder images for icons for the first second of the page load.
Be Careful With the Large Images.
If you’re using Next’s Image component, while the image is loading, a placeholder is displayed in its place. This is a great feature for big images, like the background of a hero section, but not so good for a website’s logo in the header, which is usually the first thing the user sees.
There’s a simple solution for both of these problems. We can fetch the markup from the CDN URL during the build (for example in getStaticProps) and pass it as a prop of our image component.
Be careful about that though because inlining SVGs increases the size of the HTML which impacts the lighthouse performance score. It’s fine to inline 10 – 20 small images like the aforementioned icons. Still, we don’t want a big SVG that weighs a couple of hundred kilobytes to bloat out the HTML size.
A util function that fetches the SVG markup from a URL:
export const fetchSvgMarkup = async (url) => {
 const result = await fetch(url);

 return result.text();
};
11. Utilize Next Image Component Priority Prop
In recent years browser support for preloading images has grown and is present in all most popular browsers. The image component does it all for us simply by setting a single prop – priority.
Preload an Image First and Optimize the Web Page Loading.
Preloading an image greatly increases the LCP (Largest Contentful Paint) score. It measures the time it takes to paint the largest element in the initial viewport. This is perfect for the background image of a hero section or for full-screen images.
Proceed With Caution
This feature has to be used with caution. Setting the priority prop on too many images on a single page, may bring the opposite result and slow the page down!
It’s hard to determine whether the section will be visible in the initial viewport. A better idea is to add a checkbox to the image model in the CMS with the information on when the user should check it.
“We ran tests on a site that uses JavaScript to lazy-load responsive images. Preloading resulted in images loading 1.2 seconds faster.”
https://web.dev/preload-responsive-images/
An example of priority prop usage:
<Image
 src="big_background.png"
 alt="The background image of a hero section"
 width={1920}
 height={1080}
 priority
/>
12. Use Resource Directives
Resource Directives tell the browser which resources it should load first. Doing this correctly speeds up the loading time of a page. There are three most important directives:
dns-prefetch
DNS-prefetch tells the browser to set up a DNS connection. You should use it for all critical assets on external domains.
Use cases for dns-prefetch are the same as for preconnect. It’s a little more expensive operation and should be used for the most important links. Whereas dns-prefetch should be used for all others or as a fallback since the browser support is better than for preconnect.
preconnect
This does the same as dns-prefetch, but also performs TCP negotiation and TLS handshake. It should be used for external sources that you know the browser will need quickly.
A good example of using this directive is pre-connecting to 3rd party font providers like google fonts. Other use cases may be pre-connecting to a 3rd party provider with a stylesheet needed for some libraries, for example, some carousel libraries host the CSS needed in a CDN.
Pre-connecting also makes sense for CDN that hosts images used on our website, for example, when using Sanity, all of the images are stored under https://cdn.sanity.io/, so pre-connecting will give us a great boost in performance.
preload
Preload tells the browser to load the specified file to the cache. It should be used for files that are required to display the page, such as a font that’s specified in a stylesheet.
Besides caching the resource, the preload directive is also a hint to the browser to load the specified file as soon as possible. Some use cases of preload would be:
- Fonts defined in stylesheets – The font faces declared in css will start loading after the css has been loaded and parsed, preloading causes the browser to load those fonts immediately.
- Images defined in stylesheets – Images referenced from a stylesheet won’t start loading until the CSS file is downloaded and parsed. Preloading those images will mitigate that issue.
Example of using the preconnect directive for Google Fonts:
<link rel="preconnect" href="https://fonts.gstatic.com" crossorigin />
13. Load Libraries Dynamically
Third-party libraries are great but can weigh quite a bit, impacting the page speed score. By default, the source code of those libraries is placed in the JS bundle fetched when the user visits the page.
If we’re using Formik to handle the contact form on the bottom of a page or Algolia for searching, none of those features (or rarely) are used immediately after visiting the page. What we can do is use dynamic imports to load them later in a separate bundle.
For the Algolia, we can import its source code when the user focuses the search input, during the time he’s inputting the query, the library will be ready. As for Formik, we can start fetching the library on the first user interaction with the page, like scroll or touch event.
Example of dynamically using a package using the scroll event:
useEffect(() => {
   const handleScroll =  async () => {
       const lib = await import("some-library");

       // Use the library, or assign it to a ref
   }

 document.addEventListener('scroll', handleScroll, {
   once: true,
 });

 return () => {
   document.removeEventListener('scroll', handleScroll);
 }
}, []);
14. Utilize Intersection Observer API
Leveraging the Intersection Observer API in Next.js applications offers a performant solution to the issue of unnecessary data fetching. Deferring API calls until a component enters the viewport can reduce initial page load times and conserve bandwidth.
It’s a particularly effective solution for components that fetch large JSON payloads or rely on third-party APIs. Implementing this involves setting up an Intersection Observer to track the visibility of a component.
When the user scrolls and the component becomes visible, the observer triggers a data fetch from the API. This on-demand loading, or ‘lazy loading’, ensures that data is only requested when needed, aligning network activity with user interactions.
Increasing Google Pagespeed Insights Score in Next.js For Better Search Engine Ranking
As you see, you don’t need to go looking for a new hosting company, migrate your blog from WordPress, or do a complete SEO audit of your site to significantly improve your score and website performance in general.
As a developer, there are ways to improve your score to improve your website’s page speed, page load, and all the other Google metrics. Remember to use Google Pagespeed Insights to improve your page speed, and if you have any further questions, feel free to ask us.
Need Help in Improving Your Pagespeed Results?
Read more
Best React js Tech Stack in 2024