Headless solutions are becoming more and more popular in eCommerce world, and Saleor platform is raising as one of the most interesting in that area.
A few weeks ago a client asked us to build a modern eCommerce system dedicated to the food delivery industry.
As we’re an experienced React development company, focused on the front end to build a full project we had to pick a headless eCommerce solution. We’ve decided to use Saleor because it was a client preference and also matched our technology stack.
As we are an experienced Progressive Web app development company, our first step in this project was to lead a discovery stage containing a Proof Of Concept (PoC) Storefront.
PoC Objectives
Key objectives in this Proof of Concept were to achieve a super fast and offline-working PWA storefront, with support for both rtl & ltr languages and the ability to browse products by categories and add them to cart.
Everything should be fed by Saleor headless eCommerce API.
What is a storefront?
Basically, a storefront is the part of your shop that everyone sees and it has to attract attention. For online shops, this is the website that users can use to browse the shop and make purchases. Just like a physical storefront, it has to attract attention but also be intuitive and pleasant to use – this means it has to be blazingly fast even with a poor internet connection or no connection at all! How this can be done?
What is the PWA storefront?
Here PWA can help us. PWA means Progressive Web App, in short, this is a website that looks good on either big or small screens but also on mobile devices, it has a “native feel” – it looks similar to apps that you install on your device but without the “installing” step. Just go to the website and add it to your start screen, that’s it!
Another big advantage of PWA is offline capabilities. PWA app constantly caches data, this allows a super-fast working page on subsequent visits, but also the app can work offline! All pages that you visited are cached and you can access them anytime no matter where you are.
What is headless eCommerce?
Headless eCommerce is nothing else than eCommerce enriched with the headless CMS solution.
Thanks to that, the frontend part is not coupled with the backend anymore, which means you can send the information (products, reviews, stocks, etc.) straight from the backend to any device without any limitation from the frontend side. Later on, the frontend can be presented by the developer in any form or shape you want.
In other words, you don’t have to pre-define the experience for your users (nor admins), and you can use the blessing of (in fact) unlimited experience customization.
Is PWA a Good Choice in Your Case?
Most valuable advantages of headless eCommerce with Saleor:
- Faster time to market
- Unlimited experience customization
- Enables you to go fully omnichannel
- Deploy quick changes instantly
- Build additional landing pages quickly
- Easier for marketing conversion tests
What is Saleor?
Saleor is a complete headless e-commerce platform.
It consists of 3 main parts:
- Saleor Core – backend written in Python connected with PostgreSQL database.
- Dashboard – Website build using React for store owners members.
- Saleor Storefront – Example website for clients build using React.
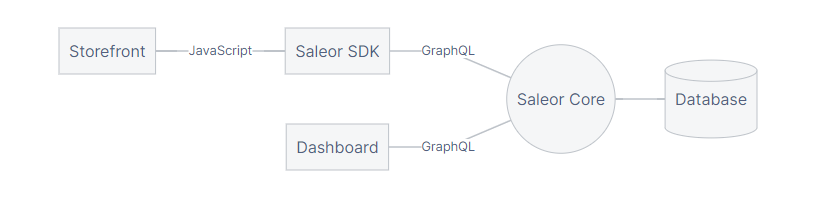
It uses GraphQL to communicate with storefront and dashboard.
Building PWA Storefront with Saleor as a headless eCommerce
Step 1: Display the Categories Listing
To get data from API we use ApolloClient as it is one of the best solutions to communicate using GraphQL.
To get a list of products/categories we simply execute a GraphQL query.
More on how the queries should look like on https://docs.saleor.io/docs/developer/products
Example query for getting categories with translations:
import { gql } from "apollo-boost";

export const categoriesQuery = gql`
  query categories($language: LanguageCodeEnum!) {
    shop {
      name
      description
      homepageCollection {
        backgroundImage {
          url
        }
      }
    }
    categories(first: 9) {
      edges {
        node {
          id
          name
          translation(languageCode: $language) {
            name
          }
          backgroundImage {
            url
          }
        }
      }
    }
  }
`;
As you can see using GraphQL we fetch only the data we need which can greatly reduce loading speeds. In this example, we fetch the first 20 categories from the API and we get their id, name, translation (if it exists, else we use the original name) and URL for an image of the category.
Step 2: Prepare Product Details Page
Example query fetching product details. It’s part of Saleor-SDK.
This query is responsible for fetching product details. It utilizes fragments.
export const productDetails = gql`
  ${basicProductFragment}
  ${selectedAttributeFragment}
  ${productVariantFragment}
  ${productPricingFragment}
  query ProductDetails($id: ID!) {
    product(id: $id) {
      ...BasicProductFields
      ...ProductPricingField
      descriptionJson
      category {
        id
        name
        products(first: 3) {
          edges {
            node {
              ...BasicProductFields
              ...ProductPricingField
              category {
                id
                name
              }
            }
          }
        }
      }
      images {
        id
        url
      }
      attributes {
        ...SelectedAttributeFields
      }
      variants {
        ...ProductVariantFields
      }
      seoDescription
      seoTitle
      isAvailable
    }
  }
`;
Example product fragment. It’s part of Saleor-SDK.
export const basicProductFragment = gql`
  fragment BasicProductFields on Product {
    id
    name
    thumbnail {
      url
      alt
    }
    thumbnail2x: thumbnail(size: 510) {
      url
    }
  }
`;
A fragment is a reusable part of the GraphQL query that allows you to put it in different queries without repeating code.
Step 3: Add RTL Arabic Support
The biggest challenge in providing arabic support was right-to-left orientation of the page layout.
A simple solution might be to just add a CSS property direction: rtl in the root of the page, but this doesn’t resolve all the issues we might face. For example, if we use images like leftArrowImage that expands some menu or we position something absolutely. They won’t react the way we might want just by changing the direction CSS property. To resolve this issue I created a store in redux to hold the selected language and its direction. (It may be moved to apolloClient in the future as apollo now can hold local state data). This way any component that need to react for language direction changes can get the current direction of the chosen language.
Action types for setting language in redux:
export const SET_LANGUAGE = "SET_LANGUAGE";

interface SET_LANGUAGE_ACTION {
  type: typeof SET_LANGUAGE;
  payload: {
    language: Language;
    direction: Direction;
  };
}

export type LanguageActionsTypes = SET_LANGUAGE_ACTION;
Actions responsible for setting and getting the default language. Also, they change the i18n language for translating local site content:
import { AnyAction, ActionCreator, Dispatch } from "redux";
import { ThunkAction } from "redux-thunk";

import Language from "../../types/language";
import { LanguageActionsTypes, SET_LANGUAGE } from "./actionTypes";
import Direction from "../../types/direction";
import i18n from "../../i18n";

const LANGUAGE_KEY = "language";

export const setLanguageAction = (
  language: Language
): LanguageActionsTypes => ({
  type: SET_LANGUAGE,
  payload: {
    language,
    direction: language === Language.ar ? Direction.rtl : Direction.ltr,
  },
});

export const setLanguage: ActionCreator<ThunkAction<
  void,
  {},
  Language,
  AnyAction
>> = (language: Language) => (dispatch: Dispatch) => {
  setLanguageOnLocalStorage(language);
  dispatch(setLanguageAction(language));

  i18n.changeLanguage(language?.toLowerCase());
};

export const getLanguageFromLocalStorage = (): Language => {
  try {
    const language = localStorage.getItem(LANGUAGE_KEY) as Language;
    if (language) return language;
    else return Language.en;
  } catch {
    return Language.en;
  }
};

export const setLanguageOnLocalStorage = (language: Language): void => {
  try {
    localStorage.setItem(LANGUAGE_KEY, language);
  } catch {}
};

export const setInitialLanguage: ActionCreator<ThunkAction<
  void,
  {},
  {},
  AnyAction
>> = () => (dispatch: Dispatch) => {
  const language = getLanguageFromLocalStorage();
  dispatch(setLanguageAction(language));

  i18n.changeLanguage(language?.toLowerCase());
};
Reducer for the language store:
import LanguageState from "../../types/languageState";
import { LanguageActionsTypes, SET_LANGUAGE } from "./actionTypes";

const initialState: LanguageState = {
  name: null,
  direction: null,
};

export const languageReducer = (
  state = initialState,
  action: LanguageActionsTypes
): LanguageState => {
  const { type, payload } = action;

  switch (type) {
    case SET_LANGUAGE:
      return {
        ...state,
        name: payload.language,
        direction: payload.direction,
      };
    default:
      return state;
  }
};
Selectors allowing easy access to the store:
import RootState from "../../types/rootState";
import LanguageState from "../../types/languageState";
import Language from "../../types/language";
import Direction from "../../types/direction";

export const languagesSelector = (state: RootState): LanguageState =>
  state?.language;

export const languageNameSelector = (state: RootState): Language | null =>
  languagesSelector(state)?.name;

export const languageDirectionSelector = (state: RootState): Direction | null =>
  languagesSelector(state)?.direction;
Step 4: Offline support
To make the app able to work offline I used the serviceWorker that is built-in in create-react-app. This makes the site cache its content on localStorage of the device thus allows opening all of previously visited pages without the need for an internet connection.
But this way we cache only local content of the page, what about API responses? ApolloClient already has a built-in mechanism to cache responses from our API. But they are session-bound. All we need to do then is save the cache to our local storage using “apollo-cache-persist”. This way we can browse the app offline with all of its contents.
To make the serviceWorker able to work just look for serviceWorker.unregister() line in your index.tsx/jsx file and change it to serviceWorker.register(). This will take care of caching all of your site local content on users device when they are browsing your page. Keep in mind that it will not work on development mode. And if you want to test it outside your pc you need an https server (thanks to Tomasz Chmiel).
As I said before ApolloClient already caches all data it fetches from the API but it is session-bound. All we need to do is to save this data to local storage so it can be reused even after the user leaves the page. To do this we add apollo-cache-persist to our apollo client config.
Apollo client with persist implementation:
import { ApolloClient } from "apollo-boost";
import { HttpLink } from "apollo-link-http";
import { CachePersistor } from "apollo-cache-persist";
import { InMemoryCache, NormalizedCacheObject } from "apollo-cache-inmemory";
import { PersistentStorage, PersistedData } from "apollo-cache-persist/types";

import api from "./constants/api";

const SCHEMA_VERSION = "1";
const SCHEMA_VERSION_KEY = "apollo-schema-version";

const getApolloClient = async () => {
  const httpLink = new HttpLink({ uri: api.rootApiUrl });
  const cache = new InMemoryCache();

  const persistor = new CachePersistor({
    cache,
    storage: window.localStorage as PersistentStorage<
      PersistedData<NormalizedCacheObject>
    >,
  });

  const currentVersion = window.localStorage.getItem(SCHEMA_VERSION_KEY);

  if (currentVersion === SCHEMA_VERSION) {
    await persistor.restore();
  } else {
    await persistor.purge();
    window.localStorage.setItem(SCHEMA_VERSION_KEY, SCHEMA_VERSION);
  }

  return new ApolloClient({ link: httpLink, cache });
};

export default getApolloClient;
Source: https://rubygarage.org/blog/pwa-with-react-apollo
SCHEMA_VERSION allows us to reset the cache on all client devices when we make breaking changes in our local database.
Conclusions
Creating a new Saleor powered storefront from scratch is pretty straightforward and easy.
All basic queries (like fetching products, making purchases) are nicely described in the docs, also GraphQL playground has nice and detailed documentation of every query and mutation, but I had some hard time choosing right product variant by selected product options, probably this will be easier when we will get final SDK for the storefront.
This is the biggest issue – lack of polished and ready to use SDK (when I started working with Saleor there wasn’t any package that you could just npm install to your project). But recently Saleor dev team created a separate ready to use saleor-sdk that you can install. It’s still under development but it should make development much simpler and more user friendly.
Overall – Saleor is pretty straightforward to use and extend but still needs polishing in the case of SDK.