
Introduction
Expo is a fantastic tool to make an app in React Native.
As an Expo agency, we find developing mobile applications in a blink of an eye, without additional settings and without wasting time on configuration, as one of its main benefits.
It is a very good tool to prepare both the MVP or just very basic app.
But sometimes we have to do something more complicated which isn’t supported by Expo – like writing our own native module or using a package.
The natural thing, in this case, is eject from Expo, but sometimes we don’t want to use Expo anymore at all – don’t use their modules anymore or want our app weighs a little less.
In this tutorial, I will show you how to quit the Expo app totally and have a plain Vanilla React Native app.
Starting from the beginning
If you still have a managed workflow in your React Native Expo app, the first step should be eject to bare workflow.
To do it you have to run expo eject.
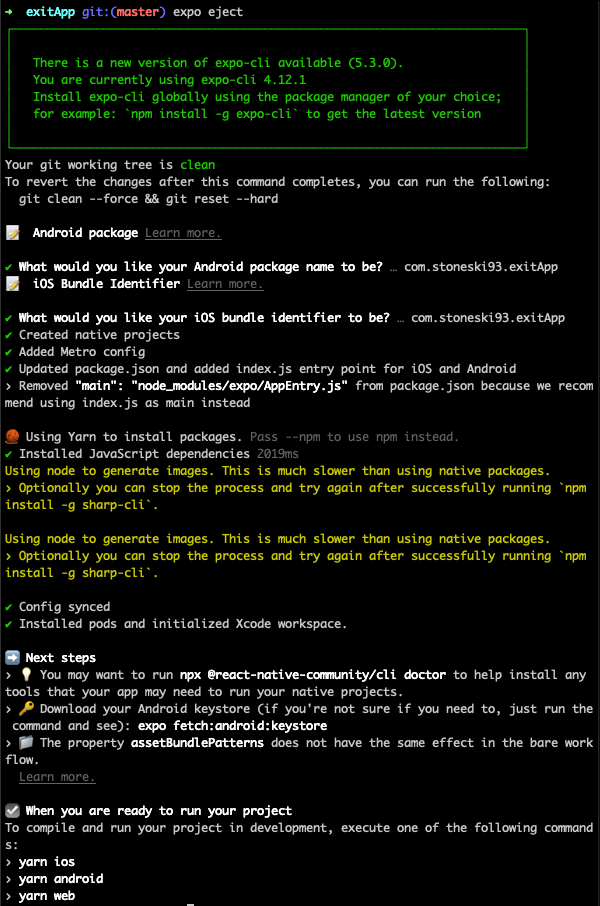
Now you have access to the native Android and iOS directories.
Starting from SDK 43, in our Expo React Native project we have got Expo modules.
It includes only a minimal set of packages that are needed in nearly every app and autolinking infrastructure that other Expo SDK packages are built with.
This allows you to add any other Expo module from the SDK.
Mind that removing Expo completely from the project equals removing expo modules and all references in native iOS/Android files.
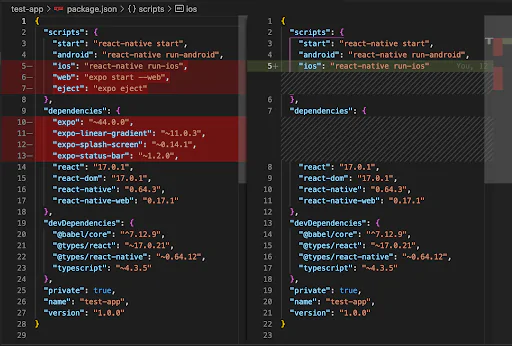
Let’s start from package.json.
If we are using any of the Expo packages, we should find some alternative to it.
In our project we are using an expo-linear-gradient package.
After removing Expo modules from the project we can’t use it anymore.
Fortunately there is a react-native-linear-gradient package which doesn’t need Expo support.
So if we find alternatives, install it and update the code. The next step will be removing Expo and all Expo packages from package.json.
Then you should remove .expo directiories

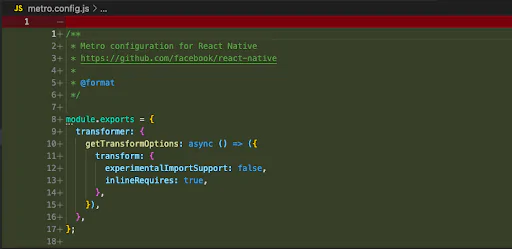
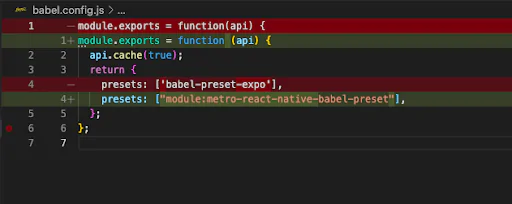
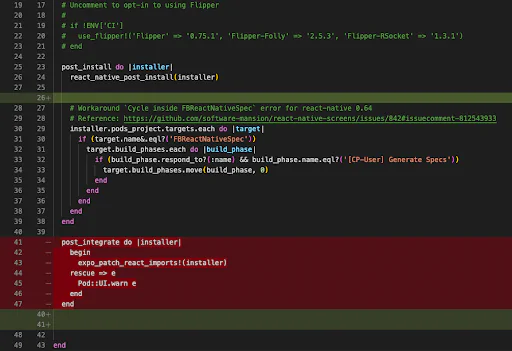
If you finished with removing, as a next step delete babel-preset-expo in the babel.config.js and clear a metro.config.js
In this step we need to add metro-react-native-babel-preset to our project.
Add it by using npm/yarn and then update the babel.config with it.
Last step in JavaScript part is change in index.js
Kickstart your react project with top developers
Removing Expo from iOS
After ejecting our app, the folder structure appears in our iOS directory.
It contains all the files used to run/compile/build app on our iOS devices.
When we create an app with Expo – it also has references to that native files.
After removing the Expo package, we should also remove all references from native code.
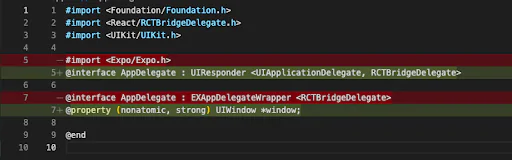
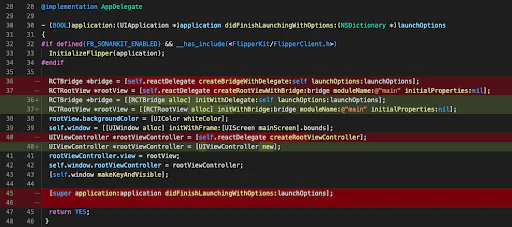
These files are AppDelegate.h, AppDelegate.m and Podfile. Let’s do it according to the code posted below.
AppDelegate.h

AppDelegate.m
Now, after that 2 files, we have to make some updates using XCode.
We need to remove Expo.plist reference. If you are a Macbook M1 user you also have to add arm64 to the excluded architectures.
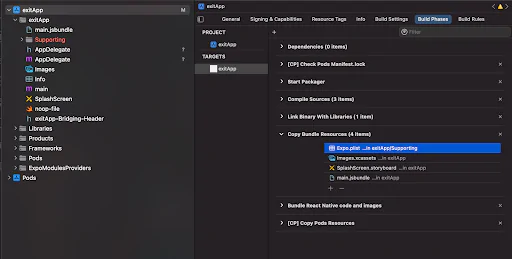
(Remove that Expo.plist by clicking minus)
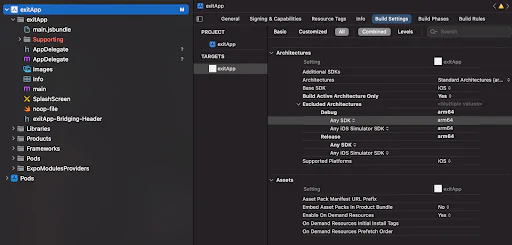
(Add arm64 to Debug and Release)
Podfile

After updating Podfile remove Pods directory from iOS directory and install Pods again.
rm -rf ./ios/Pods && pod install
Last step to run our iOS app is generating a main.jsbundle file with bundle which is served to our app by Metro packager.
To achieve that we need to run our xCode and remove references to old main.jsbundle (which doesn’t exist but our xCode reference to it anyway).
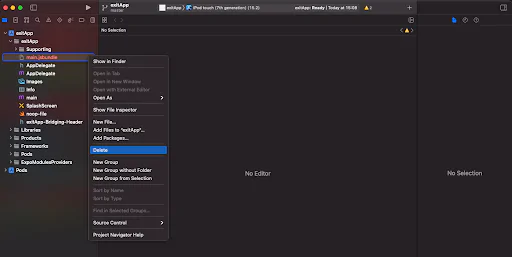
Then we need to add a script to our package.json which generates a new valid bundle.

yarn run build:ios
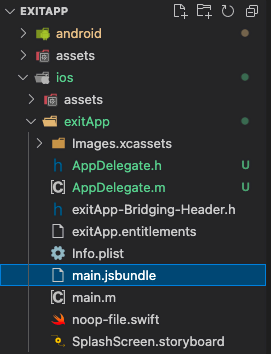
If everything will be ok you should see a new file in the iOS directory.
It was the last step. Try running a command to run your app – yarn run ios
Congratulations! You are free from Expo on iOS.
It’s time for Android now.
Removing Expo from Android
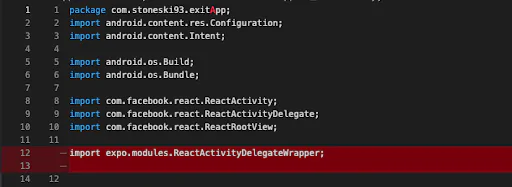
Similar to iOS, we need to remove all references from native code.
There are MainActivity.java, MainApplication.java and settings.gradle files.
This step is a little easier than the iOS procedure.
MainActivity.java

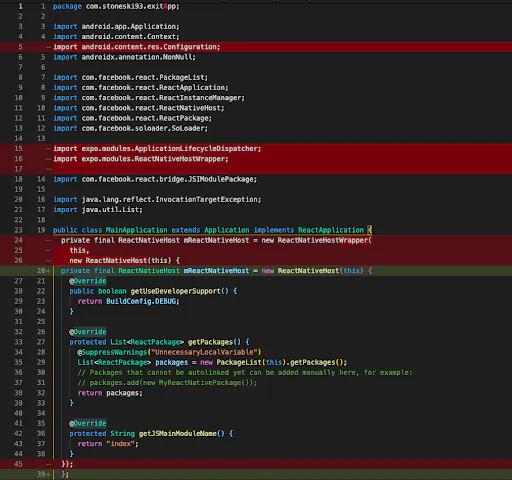
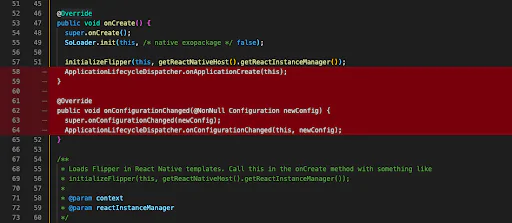
MainAppliaction.java
settings.gradle

These changes completely removes Expo from the Android part of the application.
Finally, we are free from Expo and can continue our project in Vanila manner.
Conclusion
When I wanted to remove an Expo from my project I couldn’t find any tutorial or tips on how to do it.
I hope this guide helps you with removing and everything works fine after those changes.
If you have got any questions please feel free to leave it in the comments.

Read more
How to publish React Native App to iOS and Android