CONTACT US
TABLE OF CONTENTS

Migrate from Contentful to Sanity: A Complete Developer Guide

Text graphic with bold red and white text that reads: Migrate Contentful to Sanity: A Complete Developer Guide, set against a dark background with faint outlines of rectangles and a computer monitor.

Is Contentful Migration the Right Choice for You?

While it has long been a go-to option for teams adopting headless CMS architectures, many organizations have now decided to migrate Contentful to Sanity or other setups

Companies find Contentful’s structure and pricing more and more restrictive as their projects scale. 

Limits on content types, rigid field definitions, and the absence of a real pay-as-you-go model often make it difficult to stay flexible without moving into costly enterprise plans. 

For teams focused on speed, content variety, and developer experience, these constraints are a major bottleneck. This is why they choose a shift toward more customizable and scalable alternatives like Sanity.

In this guide, I’ll show you two easy ways of migrating your setup from Contentful to Sanity. It’s the same SEO-safe migration techniques we use in our projects. Before we start, I’d like to discuss why businesses decide to move from Contentful.

Why Teams Migrate from Contentful to Sanity

Contentful Limitations

Contentful’s Starter and Lite plans are enough for most small-scale projects. However, once content structures start to grow, so do the constraints. The 25-content-type limit can be a serious obstacle for mid-sized or content-heavy applications. There’s no pay-as-you-go option, so scaling up means jumping to a much higher plan instead of paying for incremental usage. Even then, the 50-content-type limit might not be enough in some cases.

Contentful pricing comparison showing three workspace tiers — Starter Space, Lite Space, and Premium Spaces. The Starter Space and Lite Space options both include “Start for free” buttons, while Premium Spaces requires contacting sales. Below, a quota table highlights the difference in content type limits: 25 for Starter, 50 for Lite, and Custom for Premium.

On the development side, content models are bound by predefined field types, fixed validations, and a uniform UI that can’t be customized for specific workflows. Rich text editing is also rigid. You can remove formatting options from the toolbar, but not extend or tailor the editor to support things like custom blocks, lists, or reference elements.

Why Sanity Is a Better Fit

Sanity addresses these pain points with a developer-first approach. Its schema system offers full control over content types, relationships, and validation rules. PortableText replaces Contentful’s static rich text editor with a flexible structure that supports custom components and dynamic content.

Sanity CMS pricing comparison chart showing three plans — Free, Growth, and Enterprise. The Free plan offers 20 seats, 2 user roles (Administrator and Viewer), and 2 datasets with 10k documents. The Growth plan costs $15 per seat/month and expands to 50 seats, 5 user roles, 25k documents, and 4 GROQ-powered webhooks. The Enterprise plan includes custom pricing with unlimited seats, roles, and datasets. Add-ons include $999 per extra dataset and $299 for 50k additional documents.

Real-time collaboration, customizable editing interfaces, and an API built around GROQ queries make it easier to build, query, and scale complex data models. Combined with a more accommodating pricing structure and strong integration with frameworks like Next.js, Sanity offers the agility that growing teams need without forcing trade-offs.

We recommend Sanity because it gives both developers and content teams real freedom. You can shape the CMS around your product, not the other way around.

Rafał Dąbrowski, Developer at Pagepro

You can read about the differences between both CMSes in detail in our Headless CMS Guide: Sanity vs Contentful

Pricing Comparison

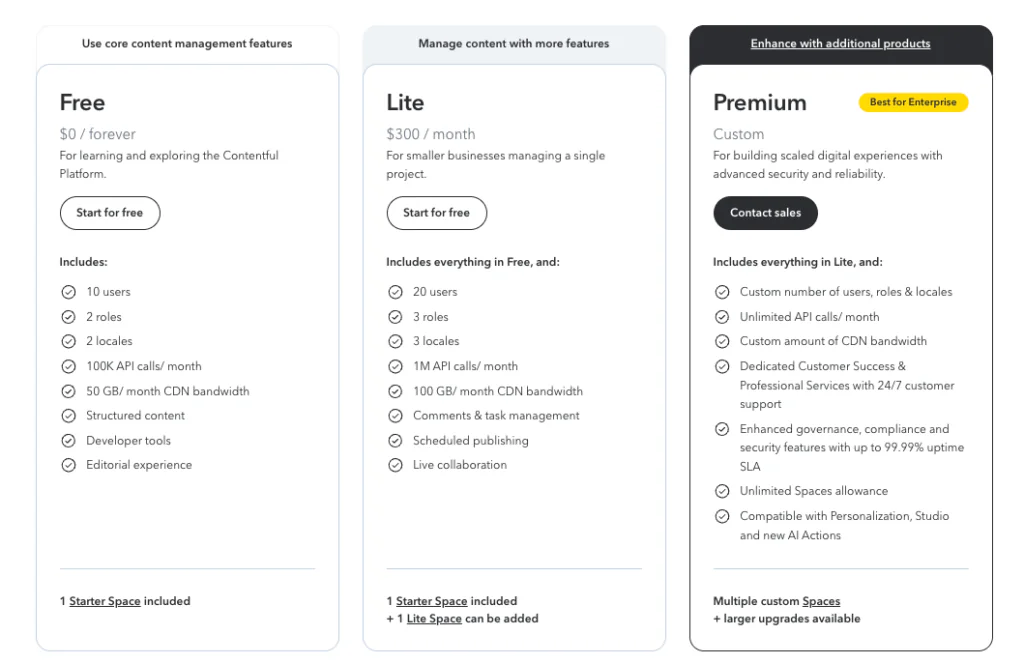
When comparing costs, Sanity stands out for its gradual, transparent pricing. It includes a forever-free tier and paid plans starting at around $15 per user/month for the “Growth” tier. 

Sanity pricing
Sanity pricing as of October 2025

Contentful does offer a free plan as well, but as soon as you require any meaningful team collaboration or commercial usage, the first paid tier jumps to around $300/month (or higher) for the next level up. Additionally, if you cross 25 content types or have more than 10k of data, you might have to buy the Lite Space, which costs $850.

Contentful Pricing
Contentful pricing as of October 2025

That sharp leap between the free plan and the next level means that the decision to “go live” with Contentful comes with a significant budget step that doesn’t scale gently. Sanity allows a smoother transition from free to paid, whereas with Contentful, you may face a big budget move early on.

Understanding the reasons to migrate Contentful to Sanity, we can look into how to make your transition safe and effective.
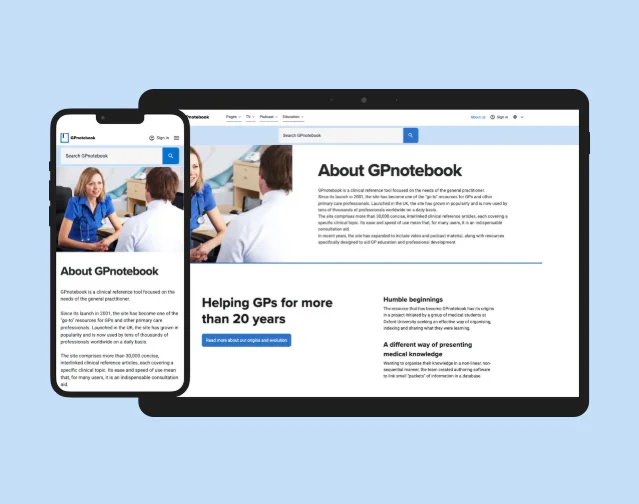
GPnotebook

Migrating a 100K+ Page Medical Platform with Next.js & Sanity

READ THE CASE STUDY
A smartphone and a tablet display the About GPnotebook webpage, featuring details like sanity vs wordpress in its history, its purpose for GPs, and a photo of healthcare professionals talking—all against a light blue background.

Planning a Safe Migration

Migrating from Contentful to Sanity is a structural change that can impact how your content, SEO, and integrations behave. Before running any scripts, decide which migration strategy makes the most sense for your project and learn about its risks.

Understand the Risks

One of the first challenges is feature parity. Sanity may not have direct replacements for every Contentful plugin, so some marketplace extensions might need to be rebuilt or replaced with custom solutions. In many cases, this becomes an opportunity to clean up unused or outdated features. If a plugin supports a critical part of your workflow, plan for a rebuild.

Next, consider the SEO and content integrity risks. Losing URL structures, internal links, or metadata during transfer can cause ranking drops and broken pages. Redirects, sitemaps, and structured data should be verified early in the process for a smooth transition.

There’s always the risk of data corruption or loss. Complex content models, broken relationships, and rich text formatting can all suffer during conversion, especially when dealing with localized data or large asset libraries.

That’s why migration testing should happen at multiple stages. First with automated checks (to confirm record counts, field types, and assets) and then with manual visual reviews to confirm that the content looks identical in Sanity Studio and on the frontend.

Step-by-step Contentful Migration Guide Preview

Choose the Right Migration Path

Once you’ve assessed the risks, decide how much of the existing structure should carry over. There are two approaches you can take:

  • Keep your existing structure: A fast and low-risk path where you move the current setup to Sanity without major refactoring. It’s ideal if your main goal is to reduce costs or overcome Contentful’s limitations without redesigning your data model.
  • Rebuild and migrate: A more strategic option where you use a custom script to redesign your content structure for long-term flexibility. This approach takes more time but gives you complete control over how your CMS evolves.

If you’re unsure, start by migrating the current setup using the official tool, confirm stability, and then iterate with schema improvements later. For small to mid-sized projects, this hybrid approach often completes in just a few days, as long as there are no missing dependencies or complex plugin integrations.

Not sure which migration path is better for you?

Option 1: Migrate Using the Official Contentful-to-Sanity CLI

The fastest way to transfer your content from Contentful to Sanity is to use the official CLI tool, contentful-to-sanity. It exports all your data, converts it into Sanity’s format, and even generates matching schema files. You can have a working Sanity Studio in minutes.

Step 1: Get Your Contentful Credentials

To run the script, you’ll need three API keys from your Contentful account:

  • Space ID – easiest to copy from your project URL, e.g. https://app.contentful.com/spaces/[projectURL]/views/entries or find it under Settings → Space Settings → General Settings
Contentful dashboard menu showing navigation under Space settings. The dropdown includes options such as Locales, General settings, Users, API keys, CMA tokens, and Webhooks. These settings are essential for retrieving credentials and configuring environments before running a Contentful-to-Sanity migration.
Contentful General Settings screen showing space details. The section indicates that the space was created by Jakub Dakowicz on 28 Aug 2025 and displays the Space ID field (8g9vl6174izn) with a copy button beside it. This ID is required for migration or API configuration when connecting Contentful to Sanity or other platforms.
  • Content Delivery API token – create one in Settings → API Keys.
Contentful API key settings page showing the process of generating an Access token. The form includes fields for Name, Description, Space ID (8g9vl6174izn), and a Content Delivery API access token, which is required to connect Contentful with external applications such as Sanity or Next.js during a CMS migration. The “Save” button is visible in the top-right corner for finalizing token creation.
  • Content Management API (CMA) token – generate it under Account Settings → CMA Tokens. You can then generate a new token by clicking the top-right button:
Close-up view of the blue “Create personal access token” button in Contentful’s account settings. Clicking this button generates a CMA (Content Management API) token, which allows developers to authenticate programmatically during a CMS migration or API integration process.

Tip: Set your token to expire in 1–30 days. One day is fine for testing, thirty for production

Contentful pop-up window titled “Create personal access token.” The dialog shows fields for Token name (filled with “Demo preview”) and Expiration date (set to 15 Oct 2025), with action buttons labeled Cancel and Generate. This screen is used to create a CMA token (Content Management API) that enables programmatic access for automations or migrations, such as transferring data from Contentful to Sanity.

Step 2: Run the Migration Script

Now that you have your keys, run the CLI command:

npx contentful-to-sanity@latest -s <space-id> -t <cma-token> -a <Content Delivery API - access token> ./output-path

If tokens are correct, you’ll see logs of the export. A 401 error means one of the keys is invalid.

Terminal view of the Contentful-to-Sanity migration script exporting content types, entries, and assets with successful completion logs
CLI output showing successful export of Contentful data for migration to Sanity.

After the script finishes, you’ll find these files in your output directory:

  • contentful.json and contentful.published.json – raw exports from Contentful
  • dataset.ndjson – data formatted for Sanity import
  • schema.ts – auto-generated schema matching your Contentful models
Project folder showing migration output files: contentful.json, contentful.published.json, dataset.ndjson, and schema.ts.
Files generated by the Contentful-to-Sanity migration script, ready for import into Sanity.

At this stage, you’re about halfway done. The data is ready, and the schema is mapped.

Step 3: Create Your Sanity Project

If you don’t already have a Sanity account, sign up at https://www.sanity.io/login/sign-up. Then create a new, clean project:

npm create sanity@latest \
  --template clean \
  --create-project "Your Project Name" \
  --dataset production \
  --output-path my-sanity-project

Log in when prompted, select “Create new project”. Choose your organization, and follow the prompts. You should have a clean Sanity project.

Sanity project folder structure in VS Code showing configuration files and schemaTypes directory.
Sanity project directory after initialization, ready for importing migrated content.

Open your sanity.config and sanity.cli files to check your project ID and dataset. You’ll need them soon.

Now, copy the generated schema.ts into your schemaTypes directory with an updated naming:

Sanity schemaTypes folder containing index.ts and schema-contentful.ts used for CMS schema setup.

And update your index.ts:

import { types } from "./schema-contentful";
export const schemaTypes = [...types];


That will allow us to add new schemas later without impacting the auto-generated file. Now, it’s time to test our new CMS system with the schema.

Run npm run dev to preview your new Studio. You should see something like this:

Sanity Studio dashboard displaying imported content types after migration from Contentful.

On the left, you can see all of the content types, which will be empty for now. Remember their names, before we move on to the next step: data migration.

Step 4: Import Your Content

Copy dataset.ndjson into your project and run:

npx sanity dataset import ./dataset.ndjson
Sanity project directory in VS Code showing dataset.ndjson file prepared for import.
dataset.ndjson file ready for import into Sanity Studio

Select your dataset (default: production).

Terminal output showing successful import of 54 documents and assets into Sanity production dataset.
Successful data import

After the import completes, your entries will appear inside Sanity Studio.

Sanity Studio showing imported content types and documents after migration from Contentful.
Sanity Studio view

Next, you should update your fetching methods in the NextJS app to use the new data source

Step 5: Update Your Queries

Replace your Contentful GraphQL API with Sanity’s GROQ-based client.

// Sanity client configuration
const client = createClient({
  projectId: process.env.NEXT_PUBLIC_SANITY_PROJECT_ID || 'your-project-id',
  dataset: process.env.NEXT_PUBLIC_SANITY_DATASET || 'production',
  apiVersion: '2024-01-01',
  useCdn: process.env.NODE_ENV === 'production',
  token: process.env.SANITY_API_TOKEN,
});

We need to update our API calls and queries. Since Contentful uses GraphQL queries, let’s start by converting them into GroQ queries. If you’re struggling with this part, consider using an AI to help.

const PAGE_GROQ_FIELDS = `
_id,
 _type,
 "slug": slug.current,
 internalName,
 pageName,
 seo {
   _id,
   _type,
   name,
   title,
   description,
   "ogImage": image.asset->url,
   noIndex,
   noFollow
 },
 topSection[] {
   _id,
   _type,
   _ref,
   internalName,
   // Component CTA
   ...(_type == "componentCta" => {
     headline,
     subline,
     ctaText,
     targetPage-> {
       "slug": slug.current
     },
     urlParameters,
     colorPalette
   }),
   // Component Duplex
   ...(_type == "componentDuplex" => {
     containerLayout,
     headline,
     bodyText,
     ctaText,
     targetPage-> {
       "slug": slug.current
     },
     image {
       asset-> {
         url,
         metadata {
           dimensions
         }
       },
       alt
     },
     imageStyle,
     colorPalette
   }),

The -> sign is very important here. When a field is a reference to another document, by default, we only get the reference id. To get real values from this reference and resolve it, you need to use -> syntax.

Step 6: Update the Code

After updating the queries, we can now focus on updating the code where we fetch the data. Right now, your setup is fetching all posts and uses the GraphQL, Contentful URL, and access tokens


xport async function getAllPosts(isDraftMode: boolean): Promise<any[]> {
 const entries = await fetchGraphQL(
   `query {
     pageCollection(where: { slug_exists: true }, preview: ${
       isDraftMode ? "true" : "false"
     }) {
       items {
         ${POST_GRAPHQL_FIELDS}
       }
     }
   }`,
   isDraftMode,
 );
 return extractPostEntries(entries);

Let’s update it to use our new Sanity client and query.

// Get all pages
export async function getAllPosts(isDraftMode: boolean): Promise<any[]> {
 const query = groq`*[_type == "page" && defined(slug.current)] | order(_createdAt desc) {
   ${PAGE_GROQ_FIELDS}
 }`
  const entries = await client.fetch(query)
 return extractPageEntries(entries)
}

Update all of the places where you fetch the data from Contenful to use Sanity.

You can still use GraphQL in this scenario. Go to the official Sanity docs and see how to implement that. It requires a few additional steps, like deploying the API on every change to the schema.

Step 7: Update the Richtext

Now we need to update the richtext component. Contentful uses its own logic to store and render the richtext markdown. Sanity has a different approach and its own pattern to keep this kind of data using the PortableText component, which we will apply now

We need to define the components we want to use for each block type and replace the old Markdown renderer.  Update the markdown component to something similar to this one:

import Image from "next/image";
import { PortableText } from "@portabletext/react";
import { PortableTextBlock } from "@portabletext/types";


interface SanityImage {
 _id: string;
 url: string;
 alt?: string;
 caption?: string;
 asset: {
   _ref: string;
   _type: string;
 };
}


interface SanityContent {
 _type: string;
 _key: string;
 children?: Array<{
   _type: string;
   _key: string;
   text: string;
   marks?: string[];
 }>;
 markDefs?: Array<{
   _key: string;
   _type: string;
   href?: string;
 }>;
 asset?: SanityImage;
 url?: string;
 alt?: string;
}


interface PortableTextContent {
 _type: "block" | "image" | "code" | "table" | "list";
 _key: string;
 children?: SanityContent[];
 markDefs?: SanityContent[];
 asset?: SanityImage;
 url?: string;
 alt?: string;
 code?: string;
 language?: string;
}


function SanityImageComponent({ value }: { value: SanityImage }) {
 return (
   <div className="my-6">
     <Image
       src={value.url}
       alt={value.alt || ""}
       width={800}
       height={600}
       className="rounded-lg"
       style={{
         width: "100%",
         height: "auto",
       }}
     />
     {value.caption && (
       <p className="text-sm text-gray-600 mt-2 text-center italic">
         {value.caption}
       </p>
     )}
   </div>
 );
}


function CodeBlock({ value }: { value: { code: string; language?: string } }) {
 return (
   <pre className="bg-gray-100 p-4 rounded-lg overflow-x-auto my-6">
     <code className={`language-${value.language || "text"}`}>
       {value.code}
     </code>
   </pre>
 );
}


const components = {
 types: {
   image: SanityImageComponent,
   code: CodeBlock,
 },
 marks: {
   link: ({ children, value }: { children: React.ReactNode; value: { href: string } }) => (
     <a
       href={value.href}
       target="_blank"
       rel="noopener noreferrer"
       className="text-blue-600 hover:text-blue-800 underline"
     >
       {children}
     </a>
   ),
   strong: ({ children }: { children: React.ReactNode }) => (
     <strong className="font-bold">{children}</strong>
   ),
   em: ({ children }: { children: React.ReactNode }) => (
     <em className="italic">{children}</em>
   ),
   code: ({ children }: { children: React.ReactNode }) => (
     <code className="bg-gray-100 px-1 py-0.5 rounded text-sm font-mono">
       {children}
     </code>
   ),
 },
 block: {
   h1: ({ children }: { children: React.ReactNode }) => (
     <h1 className="text-3xl font-bold mb-4 mt-8">{children}</h1>
   ),
   h2: ({ children }: { children: React.ReactNode }) => (
     <h2 className="text-2xl font-bold mb-3 mt-6">{children}</h2>
   ),
   h3: ({ children }: { children: React.ReactNode }) => (
     <h3 className="text-xl font-bold mb-2 mt-4">{children}</h3>
   ),
   h4: ({ children }: { children: React.ReactNode }) => (
     <h4 className="text-lg font-bold mb-2 mt-4">{children}</h4>
   ),
   normal: ({ children }: { children: React.ReactNode }) => (
     <p className="mb-4 leading-relaxed">{children}</p>
   ),
   blockquote: ({ children }: { children: React.ReactNode }) => (
     <blockquote className="border-l-4 border-gray-300 pl-4 my-4 italic text-gray-700">
       {children}
     </blockquote>
   ),
 },
 list: {
   bullet: ({ children }: { children: React.ReactNode }) => (
     <ul className="list-disc list-inside mb-4 space-y-1">{children}</ul>
   ),
   number: ({ children }: { children: React.ReactNode }) => (
     <ol className="list-decimal list-inside mb-4 space-y-1">{children}</ol>
   ),
 },
 listItem: {
   bullet: ({ children }: { children: React.ReactNode }) => (
     <li className="ml-4">{children}</li>
   ),
   number: ({ children }: { children: React.ReactNode }) => (
     <li className="ml-4">{children}</li>
   ),
 },
};


export function MarkdownSanity({ content }: { content: PortableTextBlock[] }) {
 return (
   <div className="prose prose-lg max-w-none">
     <PortableText value={content} components={components} />
   </div>
 );
}

Find all places where you’ve used the Markdown and change it from this:

<div className="prose">
<Markdown content={post.content} />
</div>

To this:

<div className="prose">
<MarkdownSanity content={post.content} />
</div>

Congratulations! This should be enough to transfer the CMS and convert your UI to use Sanity data and richtext. Now all that’s left to do is to focus on adding extra features, plugins like preview, which, in my opinion, is a must-have for editors.

Follow this guide to set it up. You can also plan out the revalidation of data. Choose either Webhooks and Revalidate API or use Sanity Live API.

Option 2: Create Your Own CMS Migration Script

If the official CLI tool doesn’t work for your project,  for example, because you use nonstandard plugins or highly customized content types,  you can create your own migration script.

This path takes longer, but it gives you full control over field mapping, schema design, and data validation.

The custom-script path takes longer, but it gives full control. Once your schemas are right, mapping is easy and the output clean and predictable.

Rafał Dąbrowski, Developer at Pagepro

Step 1: Export Data from Contentful

Start by installing the official CLI:

npm install -g contentful-cli

Log in to your Contentful account:

contentful login

Then export your space data:

contentful space export --space-id <your-space-id>

You should see a similar screen to the one from contentful-to-sanity script:

Terminal output showing successful export of 17 content types, 53 entries, and 21 assets from Contentful.
CLI output confirming successful export of Contentful data for migration to Sanity.

This command generates a .json file containing your full space data. It includes contentTypes, entries, assets, and localization information.

JSON export structure from Contentful showing content types, entries, assets, and locales.

For custom migrations, ignore contentTypes and focus on entries.

JSON object from Contentful export showing metadata, sys, and fields used for data mapping.

Each entry’s sys object tells you what content type it belongs to, along with its ID and relationships. You’ll use this data to identify how fields map to your new schema.

Contentful JSON showing contentType link structure with sys, linkType, and ID fields.

Now we see that we have a type of page. We can analyze the fields we have here.

Contentful JSON fields for a pricing page showing localized content and linked entries.

Step 2: Define Your Sanity Schemas

In a fresh Sanity project, start by creating schemas that match your data model.  Below is an example of defining SEO metadata and Page document types.

// ts-nocheck
import { defineField, defineType } from "sanity";
export const seoType = defineType({
   type: "document",
   name: "seo",
   title: "SEO meta tags",
   fields: [
     defineField({
       name: "name",
       type: "string",
       title: "Internal name",
       hidden: false,
       validation: (Rule) => Rule.required(),
     }),
     defineField({
       name: "title",
       type: "string",
       title: "SEO title",
       hidden: false,
       description: "This will override the page title in search engine results",
     }),
     defineField({
       name: "description",
       type: "string",
       title: "Description",
       hidden: false,
       description: "This will be displayed in search engine results",
     }),
     defineField({
       name: "image",
       type: "image",
       title: "Image",
       hidden: false,
     }),
     defineField({
       name: "noIndex",
       type: "boolean",
       title: "Hide page from search engines (noindex)",
       hidden: false,
     }),
     defineField({
       name: "noFollow",
       type: "boolean",
       title: "Exclude links from search rankings (nofollow)",
       hidden: false,
     }),
   ],
 });


export const pageType = defineType({
   type: "document",
   name: "page",
   title: "Page",
   description: "Our landing pages",
   fields: [
     defineField({
       name: "title",
       type: "string",
       title: "Title",
       validation: (Rule) => Rule.required(),
     }),
     defineField({
       name: "slug",
       type: "slug",
       title: "Slug",
       validation: (Rule) => Rule.required(),
     }),
     defineField({
       name: "seo",
       type: "reference",
       title: "SEO metadata",
       to: [{ type: "seo" }],
     }),
     defineField({
       name: "content",
       type: "array",
       title: "Content",
       of: [
         { type: "topicBusinessInfo" },
         { type: "topicProduct" },
         { type: "componentProductTable" },
       ],
     }),
   ],
 });

Then register these schemas in your main configuration file:

import { pageType, seoType } from "./schema.fresh";

export const schemaTypes = [ pageType, seoType ]

Step 3: Write Your Migration Script

Let’s start working on the script. It will map the data from the old system into sanity schemas and generate an .ndjson for easy import. 

First, we need to read the input file and then find the correct data from the input file and extract the required data. Then we map this data to a new schema and generate the NDJson file that we can use for import.

The final script might look similar to this:

#!/usr/bin/env node

const fs = require('fs');
const path = require('path');

const CONFIG = {
 inputFile: 'contentful-export-8g9vl6174izn-master-2025-10-15T10-17-31.json',
 outputFile: 'pages-migrated.ndjson',
 primaryLocale: 'en-US'
};

let contentfulData;
try {
 const filePath = path.join(__dirname, CONFIG.inputFile);
 console.log(`📖 Reading Contentful export from: ${filePath}`);
  contentfulData = JSON.parse(
   fs.readFileSync(filePath, 'utf8')
 );
} catch (error) {
 console.error('❌ Error reading Contentful export file:', error.message);
 process.exit(1);
}

// Filter for page entries
const pageEntries = contentfulData.entries.filter(entry =>
 entry.sys?.contentType?.sys?.id === 'page'
);

console.log(`📄 Found ${pageEntries.length} page entries`);

function convertPageToSanity(contentfulPage) {
 const fields = contentfulPage.fields;
 const primaryLocale = CONFIG.primaryLocale;
  // Map Contentful fields to Sanity schema
 const sanityPage = {
   _type: 'page',
   _id: contentfulPage.sys.id,
   title: fields.pageName?.[primaryLocale] || fields.internalName?.[primaryLocale] || 'Untitled',
   slug: {
     _type: 'slug',
     current: fields.slug?.[primaryLocale] || 'untitled'
   }
 };


 // Handle SEO reference if it exists
 if (fields.seo?.[primaryLocale]) {
   sanityPage.seo = {
     _type: 'reference',
     _ref: fields.seo[primaryLocale].sys.id
   };
 }
  //  TODO: Handle content later / add sections etc
 sanityPage.content = [];


 return sanityPage;
}

// Convert all page entries
const sanityPages = pageEntries.map(convertPageToSanity);

// Generate NDJSON output
const ndjsonContent = sanityPages
 .map(page => JSON.stringify(page))
 .join('\n');

// Write to output file
const outputPath = path.join(__dirname, CONFIG.outputFile);
try {
 fs.writeFileSync(outputPath, ndjsonContent);
 console.log(`✅ Migration completed!`);
 console.log(`📄 Converted ${sanityPages.length} pages`);
 console.log(`📁 Output file: ${outputPath}`);
} catch (error) {
 console.error('❌ Error writing output file:', error.message);
 process.exit(1);
}

// Display sample of converted data
if (sanityPages.length > 0) {
 console.log('\n📋 Sample converted page:');
 console.log(JSON.stringify(sanityPages[0], null, 2));
  // Show field mapping summary
 console.log('\n📊 Field mapping summary:');
 console.log('Contentful → Sanity');
 console.log('pageName → title');
 console.log('slug → slug.current');
 console.log('seo → seo (reference)');
}

Here’s the sample output:

Terminal output showing successful Contentful-to-Sanity migration and converted page data sample.

And the ndjson:

NDJSON file showing migrated Contentful pages with titles, slugs, and IDs ready for Sanity import.

Now that you have a working base, focus on creating and refining your schemas. Once you’re satisfied with their structure, adjust your script to map each field correctly, as shown in the example. Getting the schemas right is the most time-consuming – and important – part of this migration. Once that’s done, mapping the data is straightforward.

When your output looks correct, import it into Sanity and continue with the next steps outlined the step 4 in Option 1: updating rich text rendering and adding any plugins you need. 

Some teams use alternative methods, like web scraping, to extract content. If that approach fits your project better, it’s worth exploring.

Conclusion

Migration is a process that rewards preparation. With a clear plan, backups, and a careful approach, anybody can migrate Contentful to Sanity.

How long it takes depends entirely on your goals. If you’re simply moving to Sanity for better flexibility and are happy with your current data model, the process can be very quick. But if you’re rebuilding schemas or adding new features, treat it as an opportunity to refine your CMS structure for the long term.

Above all, never skip testing. Validate your redirects, metadata, and content relationships before the final switch. A few extra rounds of automated and manual checks can save you from downtime, broken links, and SEO drops.

Are you having problems with your CMS migration? Don’t hesitate to ask us for help!

Having problems with your CMS migration?

Sources

Read More

FAQ

Why Do Companies Migrate Contentful to Sanity?

Teams move from Contentful to Sanity for greater flexibility, customization, and predictable costs. Contentful’s model isn’t easily customizable either. 

Sanity, on the other hand, lets developers define their own content models, add custom input components, and collaborate in real time. It works better for growing teams that need control without the limits of a closed ecosystem.

Why is Contentful So Expensive?

The biggest issue with Contentful’s pricing is the steep jump between the free and paid tiers. The free plan is generous for individual developers, but for teams only a few content types and users are allowed. The next available plan costs roughly $300/month, which comes with additional purchases like different types of spaces. 

Is Sanity CMS Free?

Yes. Sanity offers a free forever plan suitable for small projects, MVPs, and personal sites. Paid plans start at around $15 per user/month, adding collaboration features, increased API limits, and additional datasets.

How Long Does it Take to Migrate Contentful to Sanity?

Migration time depends on your setup. Using the official CLI tool, a simple project can be moved in a day or two. For larger projects with custom content models, the process can take a few weeks.

What’s the Difference Between Using the CLI Tool and Writing a Custom Script for Migration?

The CLI tool is fast and automated. It exports data from Contentful, converts it into Sanity’s format, and even generates schema files. Writing a custom migration script takes longer but gives you total control. You can redesign schemas, fine-tune data mapping, and decide exactly how relationships and fields are structured.

Can I Migrate Assets, Such as Images and PDFs, from Contentful to Sanity?

Yes. The official CLI handles assets automatically, while a custom script requires you to include them manually using the assets array and Sanity’s upload API.

Why Do Companies Migrate Contentful to Sanity?

Teams move from Contentful to Sanity for greater flexibility, customization, and predictable costs. Contentful’s model isn’t easily customizable either. 
Sanity, on the other hand, lets developers define their own content models, add custom input components, and collaborate in real time. It works better for growing teams that need control without the limits of a closed ecosystem.

Why is Contentful So Expensive?

The biggest issue with Contentful’s pricing is the steep jump between the free and paid tiers. The free plan is generous for individual developers, but for teams only a few content types and users are allowed. The next available plan costs roughly $300/month, which comes with additional purchases like different types of spaces.

Is Sanity CMS Free?

Yes. Sanity offers a free forever plan suitable for small projects, MVPs, and personal sites. Paid plans start at around $15 per user/month, adding collaboration features, increased API limits, and additional datasets.

How Long Does it Take to Migrate Contentful to Sanity?

Migration time depends on your setup. Using the official CLI tool, a simple project can be moved in a day or two. For larger projects with custom content models, the process can take a few weeks.

What’s the Difference Between Using the CLI Tool and Writing a Custom Script for Migration?

The CLI tool is fast and automated. It exports data from Contentful, converts it into Sanity’s format, and even generates schema files. Writing a custom migration script takes longer but gives you total control. You can redesign schemas, fine-tune data mapping, and decide exactly how relationships and fields are structured.

Can I Migrate Assets, Such as Images and PDFs, from Contentful to Sanity?

Yes. The official CLI handles assets automatically, while a custom script requires you to include them manually using the assets array and Sanity’s upload API.

Jakub Dakowicz

Jakub, the Chief Technology Officer at Pagepro, stands as a pillar of technical expertise and leadership within the company. With an impressive tenure of nearly nine years at Pagepro, and over five years leading the development team, he has been a key figure in shaping the company's technological advancements and strategies.

Article link copied

Close button

Leave a Reply

* Required informations.