
TL;DR
• Next.js performance optimization focuses on improving page speed, reducing load times, and delivering a better user experience in modern web applications.
• Optimizing a Next.js application often involves choosing the right rendering strategy, such as static generation or server-side rendering, depending on the type of content.
• Efficient asset handling, including optimized images and smaller JavaScript bundles, plays an important role in improving application performance.
• Developers should also focus on caching strategies, code splitting, and minimizing unnecessary network requests to reduce page load times.
• Monitoring performance metrics helps identify bottlenecks that negatively affect page speed and overall application responsiveness.
• Applying structured optimization steps helps teams build faster Next.js applications that scale effectively while maintaining strong performance.
NextJS Performance Optimization: Insights for CTOs
For any CTO, NextJS performance optimization is a business priority. Performance directly shapes how users experience your product, how search engines rank it, and how well your infrastructure scales under real-world demand.
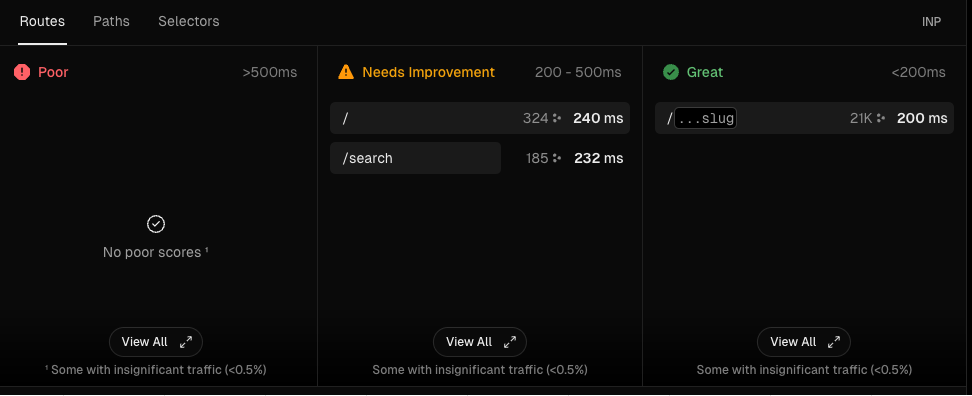
Even with Next.js’s strong foundation, challenges like poor Interaction to Next Paint (INP) scores or layout instability can appear as projects grow in scope and complexity.
The steps described in this article come from our work on a project for one of the UK’s leading medical websites. With thousands of resource-heavy pages accessed globally, optimizing performance was essential to keep the experience fast and consistent.
1. Performance Analysis and Bundle Optimization
Before diving into any overall performance optimizations, it’s crucial to conduct an initial investigation and estimate the impact and effort of potential improvements. It allows you to focus your resources on changes that will yield the best results for the least amount of work.
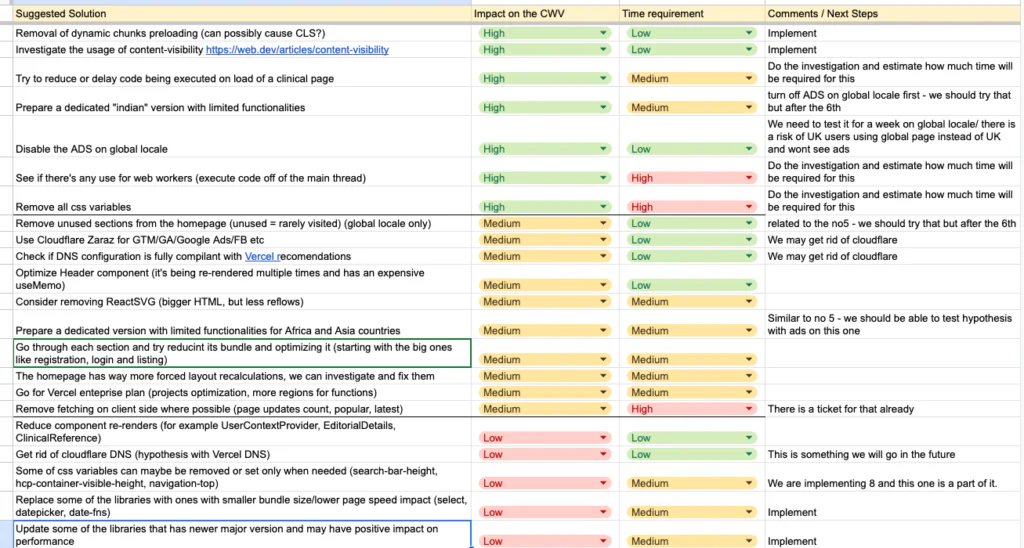
Task Prioritization Process:
- Conduct a performance audit: Use Lighthouse, WebPageTest, or Chrome DevTools to identify specific performance bottlenecks.
- Create a prioritized list: Based on your audit, create a list of potential optimization techniques. For each item, estimate the potential impact on performance metrics and the effort required to implement.
- Focus on quick wins: Start with methods that offer high impact for low effort. These might include:
- Remove unused JavaScript: Identify and remove any unused JavaScript, including unnecessary third-party scripts. Use tools like the Coverage tab in Chrome DevTools to find unused code. It can significantly reduce parsing and execution time.
- Implement content visibility: Use the CSS content-visibility property to defer the rendering of off-screen content. It’s particularly effective for long pages with a lot of content below the fold. Be aware that this property is not supported in all browsers, so implement it with progressive enhancement in mind.
- Measure and iterate: After implementing each optimization, measure its impact to refine your prioritization for future Next.js app improvements.
Analyze and Optimize Your JavaScript Bundle
A bloated JavaScript bundle is one of the most common — and most fixable — performance problems in Next.js applications. Before making any code changes, you need to see exactly what’s inside your bundle. Without that visibility, you’re optimizing blind.
Start with bundle analysis
The @next/bundle-analyzer package gives you a visual breakdown of every module in your build output. Install it and add it to your next.config.js:
npm install @next/bundle-analyzer// next.config.js
const withBundleAnalyzer = require('@next/bundle-analyzer')({
enabled: process.env.ANALYZE === 'true',
});
module.exports = withBundleAnalyzer({
// your existing Next.js config
});Then run:
ANALYZE=true npm run buildYou’ll get an interactive treemap showing which packages are taking up the most space. In our experience, this almost always surfaces a few large libraries that are being imported far more broadly than necessary.
Use dynamic imports for non-critical components
Not every component needs to be in the initial bundle. Next.js makes it straightforward to split off components that aren’t needed for the first render:
import dynamic from 'next/dynamic';

const HeavyChart = dynamic(() => import('../components/HeavyChart'), {
  loading: () => <p>Loading chart...</p>,
  ssr: false, // use when the component relies on browser APIs
});
This is particularly effective for rich text editors, data visualisation libraries, and any component that only appears after user interaction. We’ve seen initial load times drop noticeably just by moving a single heavy third-party component behind a dynamic import.
Replace or selectively import large libraries
Many projects import entire libraries when they only use a fraction of what’s available. Lodash is the classic example. Compare these two approaches:
// ❌ Imports the entire lodash library (~70kb gzipped)
import _ from 'lodash';
const result = _.groupBy(items, 'category');

// ✅ Imports only the function you need (~1kb)
import groupBy from 'lodash/groupBy';
const result = groupBy(items, 'category');
The same principle applies to libraries like date-fns, ramda, or UI component kits — always check whether the library supports tree-shaking or per-function imports before committing to a full install.
Verify tree-shaking is working
Tree-shaking removes unused exports from your final bundle, but it only works reliably when libraries use ES module syntax (import/export). If you’re pulling in a CommonJS library (require), unused code may still end up in the bundle. The bundle analyzer will show you if a package is unexpectedly large — that’s your cue to look for a lighter alternative or a more targeted import path.
A leaner bundle directly reduces parse and execution time, which shows up in both LCP and INP scores — the two Core Web Vitals most affected by JavaScript overhead.
2. Audit and Optimize Third-Party Scripts
Third-party scripts, especially ads, can have a major impact on your web app’s performance. And since you can rarely resign from them, it’s important to optimize them as much as possible. Here’s how to approach it:
- Audit your third-party scripts: Use tools such as the Network tab in Chrome DevTools or third-party script analyzers to identify all external scripts loading on your site. To help with analyzing your bundle size, consider using the
@next/bundle-analyzerpackage. - Evaluate necessity: For each script, assess whether it’s truly necessary for your site’s functionality or business goals.
- Review your libraries: Some libraries ship with many features you might never use. Look for smaller, lighter alternatives or implement the required functionality yourself if it’s simple enough. For example, if you’re using a large carousel library but only need basic functionality, consider
react-snap-carousel, which is lightweight and leverages native scroll snapping. - Optimize loading strategies:
For scripts you decide to keep, you need to:- Use async or defer attributes to prevent render-blocking.
- Consider lazy-loading scripts that aren’t needed for the initial page load.
- Implement resource hints like preconnect for critical third-party domains.
- Ad optimization:
If your site relies on ad revenue:- Consider removing or deferring ad loading for specific markets or user segments where monetization is less critical.
- Implement lazy loading for ads below the fold.
- Work with your ad partners to implement lighter, performance-optimized ad units.
- Server-side optimization: Investigate using solutions like Cloudflare Workers or Vercel‘s edge functions to optimize third-party script loading. These can be used to proxy and cache third-party resources, reducing their impact on client-side performance.
Need Help in Next.js Performance Optimization?
3. Profile and Optimize Critical Page Rendering
Focusing on your most important and frequently visited pages can yield significant overall application performance improvements:
- Identify critical pages: Use analytics data to determine which pages have the highest traffic and are most important for your business goals.
- Perform detailed analysis:
For each critical page:- Use Chrome DevTools Performance tab to create performance profiles.
- Analyze server response times, time to first byte (TTFB), and client-side rendering performance.
- Look for long tasks that might be impacting INP scores.
- Amend data fetching:
- Review your data fetching methods. Consider using Next.js’s getServerSideProps or getStaticProps to move data fetching to the server side where appropriate.
- Implement efficient caching strategies for frequently accessed data.
- Optimize component rendering:
- Use React profiler to identify components that are rendering unnecessarily.
- Implement React.memo, useMemo, and useCallback to optimize rendering performance.
- Enable the React Compiler to automatically analyze components and optimize rendering.
It reduces unnecessary re-renders and improves responsiveness with zero manual effort — and in Next.js 16, it’s no longer experimental.
- Optimize component and state management
Unnecessary re-renders are one of the quietest performance killers in a Next.js application. A component that re-renders on every parent state change — even when its own props haven’t changed — adds up fast on pages with complex UI trees.
Memoize components that receive stable propsReact.memoprevents a component from re-rendering when its props haven’t changed. It’s most effective on components that are expensive to render and receive the same props frequently:
const ProductCard = React.memo(function ProductCard({ title, price, image }) {
  return (
    <div className="product-card">
      <img src={image} alt={title} />
      <h3>{title}</h3>
      <p>{price}</p>
    </div>
  );
});
One thing we see teams get wrong: wrapping every component in React.memo by default. The memoization itself has a cost — it only pays off when the component renders often and the re-render is genuinely avoidable. Use the React Profiler first to identify which components are actually the problem.
Stabilize functions and values passed as propsReact.memo breaks down the moment you pass an unstabilized function or object as a prop — because those are recreated on every render, making every prop comparison fail. useCallback and useMemo solve this:
// ❌ New function reference on every render — breaks React.memo
const handleClick = () => doSomething(id);

// ✅ Stable reference across renders
const handleClick = useCallback(() => doSomething(id), [id]);
// ❌ New object reference on every render
const config = { threshold: 0.5, rootMargin: '100px' };
// ✅ Stable reference — only recalculates when dependencies change
const config = useMemo(() => ({
threshold: 0.5,
rootMargin: '100px'
}), []);Choose the right state management pattern
Where you put state has a direct impact on how much of your component tree re-renders when it changes. A common mistake is placing state too high in the tree — every update then triggers re-renders all the way down, even for components that don’t use that state.
As a general rule: keep state as close to where it’s used as possible. For state that genuinely needs to be shared across distant components, consider whether React Context is the right tool — Context re-renders every consumer on every update, which can cause performance problems at scale. For high-frequency updates or complex shared state, a dedicated state management library with selective subscriptions (like Zustand or Jotai) will outperform Context meaningfully.
Let the React Compiler do the heavy lifting
If you’re on Next.js 15 or later, the React Compiler handles a significant portion of this automatically — it analyzes your components and memoizes them where beneficial without any manual intervention. In practice, this means you can focus useCallback and useMemo on the cases the compiler can’t infer, rather than applying them defensively everywhere.
Getting component optimization right removes a whole category of rendering bottlenecks that slow down interaction responsiveness — and that shows directly in your INP scores.
6. Consider creating optimized versions: For markets with slower internet connections or less powerful devices, create stripped-down versions of key pages:
- Remove non-essential features or content.
- Simplify layouts and reduce the use of heavy JavaScript interactions.
- Use server-side rendering more aggressively for these versions.

4. Apply Next.js Built-In Performance Features
Next.js provides several built-in optimization features. Make sure you’re taking full advantage of these:
Code splitting:
- Use dynamic imports to code-split your application and reduce initial load times.
- Implement the Next.js dynamic import function for components that aren’t needed for the initial page load.
Image optimization:
- Use the Next.js Image component, which automatically optimizes images and implements lazy loading.
- Consider implementing a responsive images strategy to serve appropriately sized images for different devices.
Font optimization:
- Use Next.js’s automatic font optimization features to reduce layout shift and improve loading performance.
Code example allowing you to use the font in all your pages, add it to _app.js file under /pages as shown below:
import { Inter } from 'next/font/google'

// If loading a variable font, you don't need to specify the font weight
const inter = Inter({ subsets: ['latin'] })

export default function MyApp({ Component, pageProps }) {
  return (
    <main className={inter.className}>
      <Component {...pageProps} />
    </main>
  )
}
Rendering strategies:
- Implement server-side rendering (SSR) for pages that need real-time data.
- Use static site generation (SSG) for pages with content that doesn’t change frequently.
- Consider incremental static regeneration (ISR) for pages that need to be updated periodically but don’t require real-time data.
API Routes optimization:
- Use API Routes for backend functionality, but be cautious of overuse, which can impact TTFB.
- Implement efficient error handling and timeouts in API routes to prevent long-running requests from impacting performance.
5. Consider Migrating to the App Router
- If your project still uses the Pages Router, upgrading to the App Router can provide notable performance benefits.
- It offers improved data fetching strategies, native support for Server Components, and helps reduce client-side JavaScript.
- Use the
"use client"directive only when necessary — for components with interactivity, state, or browser-only APIs. - Keep client components as small as possible, ideally at the leaf nodes of your component tree.
- Migrating also aligns your application with the latest Next.js architecture and ensures long-term optimization support.
6. Optimize Images and Static Assets
Image files and other static assets often contribute significantly to page weight and can impact performance metrics:
- Implement a comprehensive image optimization strategy:
- Use the Next.js Image component for automatic optimization, including format conversion, resizing, and lazy loading.
- Use the
sizesprop to help the browser select the right image size for each viewport. - Configure
deviceSizesandimageSizesin yournext.config.jsto ensure optimal image delivery. - Set
fetchPriority="high"for above-the-fold images to improve loading speed. - Implement responsive images to serve appropriately sized images for different screen sizes.
- Consider using modern formats like WebP or AVIF, where supported.
- Optimize other static assets:
- Minify CSS and JavaScript files.
- Use efficient formats for icons (e.g., SVG for vector graphics).
- Implement a cache strategy for static assets, leveraging browser caching and CDNs.
- Lazy load below-the-fold content:
- Use the ‘loading=”lazy”‘ attribute for images and iframes below the fold.
- Implement an intersection observer for more complex lazy loading scenarios.
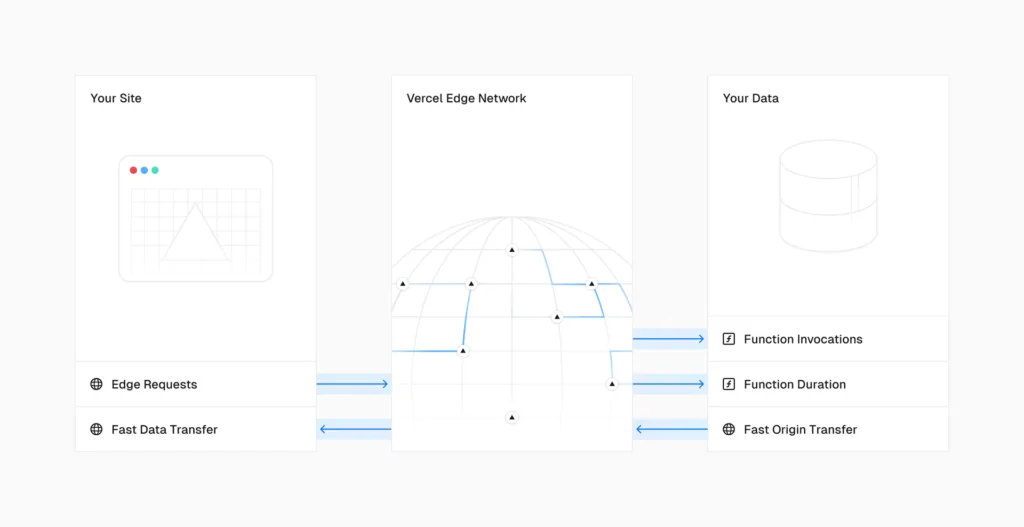
7. Optimize Your Infrastructure and CDN Setup
Your hosting and content delivery setup can significantly impact performance in a Next.js app, so you need to consider it deeply.
- Evaluate current setup:
- Analyze your current hosting and CDN configuration. Are there bottlenecks in specific geographic regions?
- Use tools like Pingdom or GTmetrix to test performance from different locations.
- Revise CDN usage:
- Ensure your CDN is configured correctly for your Next.js application.
- Consider using Vercel’s Edge Network, which is optimized for Next.js applications.
- Explore serverless and edge computing options:
- Look into using Vercel’s Edge Functions or similar serverless platforms to move computation closer to your users.
- Resolve conflicts:
- If using multiple services (e.g., Vercel and Cloudflare), ensure they’re configured correctly to avoid conflicts.
- Consider consolidating to a single platform if possible to reduce complexity and potential points of failure.

8. Regularly Update Dependencies
Keeping your project dependencies up-to-date is crucial for maintaining optimal performance:
- Implement a regular update schedule:
- Set a recurring task (e.g., monthly) to review and update dependencies.
- Use npm-check-updates or other tools to identify outdated packages.
- Prioritize updates:
- Focus on updating packages that have known performance improvements or security fixes.
- Be particularly attentive to updates for React, Next.js, and other core dependencies.
- Test thoroughly:
- Implement automated testing to catch potential issues from updates.
- Consider using a staging environment to test updates before deploying to production.
- Monitor for regressions:
- After updating, closely monitor performance metrics to ensure the updates haven’t negatively impacted performance.
9. Implement Continuous Performance Monitoring
Setting up systems to track performance metrics over time is crucial for maintaining and improving performance:
- Set up monitoring tools:
- Use Vercel Analytics, Google Analytics, or custom setups to monitor Core Web Vitals.
- Implement Real User Monitoring (RUM) to get data on actual user experiences.
- Combine Puppeteer and Lighthouse to script real user flows and run automated performance tests in a browser environment.
- Integrate them into your CI pipeline to catch regressions early, especially those affecting INP.
- Establish performance budgets:
- Set specific targets for key metrics like INP, Largest Contentful Paint (LCP), and Cumulative Layout Shift (CLS).
- Use Lighthouse CI to enforce these budgets in your CI/CD pipeline.
- Regular review process:
- Establish a regular (e.g., weekly or bi-weekly) process to review app’s performance data.
- Pay special attention to performance metrics after major releases or changes.
- Automate alerts:
- Set up automated alerts for significant next.js app performance regressions.
- Ensure your team has a clear process for addressing these alerts when they occur.
10. Optimize Performance for Global Markets
If you’re targeting global markets, creating optimized versions for specific regions can yield significant improvements:
- Analyze market-specific data:
- Use analytics tools to understand performance metrics for different geographic regions.
- Consider factors like average internet speeds and common device types in target markets.
- Develop market-specific versions:
- Create lighter versions of your site for markets with slower internet speeds or less powerful devices.
- This might involve removing features, simplifying layouts, or increasing the use of server-side rendering.
- Implement intelligent routing:
- Use geolocation or user agent detection to automatically route users to the appropriate version of your site.
- Ensure users have the option to switch to the full version if desired.
- Optimize for local conditions:
- Consider implementing local CDN endpoints for improved content delivery in specific markets.
- Optimize asset loading based on regional network characteristics.
NextJS Performance Optimization Steps Summary

Conclusion
NextJS performance optimization is a continuous process, not a one-time task. If you focus on high-impact areas and take advantage of Next.js’ built-in features, you can improve your site’s speed, scalability, and overall user experience.
And remember, performance work should be part of your ongoing development routine. Regular audits, dependency updates, and refinements keep your app fast as it grows.
The 10 steps we described above come from real projects. They helped us deliver measurable improvements in load times and stability. Implement them, track your metrics, and evolve your setup to keep your Next.js application efficient and reliable over time.
Want to boost your website performance?
Read more
Next.js, SEO and how to rank higher on Google
Improve Google Pagespeed Insights on Next js websites
Next js Middleware – What Is It and When to Use It
5 Lessons For Next js Performance Optimization in Large Projects
Next js for E-Learning Platforms
Next.js Pre-rendering and Data Fetching Methods
FAQ
Yes, Next.js is a great choice for large-scale applications because it combines server-side rendering (SSR), static generation (SSG), and incremental static regeneration (ISR) in a single framework. When properly optimized, it can handle millions of users and frequent content updates.
Edge Functions run code closer to the user, reducing latency and improving response times. In Next.js, they can handle tasks like authentication, redirects, or data transformation at the network edge instead of the origin server.
Ideally, you should perform regular check-ups every few weeks or after each major release. Ongoing checks help detect regressions early and maintain consistent performance as your app evolves. To help with that, you can set up automated tracking for Core Web Vitals using tools like Vercel Analytics, Lighthouse CI, or Real User Monitoring (RUM).
Use the @next/bundle-analyzer package to visualize your JavaScript bundles. It highlights large or unnecessary dependencies so you can remove, replace, or lazy-load them. Replacing oversized libraries with smaller alternatives can trim bundle size, quicken initial load times, and enhance Next.js performance optimizations.
Focus on Core Web Vitals:
1. INP (Interaction to Next Paint) – measures responsiveness.
2. LCP (Largest Contentful Paint) – reflects loading speed.
3. CLS (Cumulative Layout Shift) – captures visual stability.
Monitoring these metrics gives the clearest view of real user experience.
The success of NextJS performance optimization can be affected by many different factors. Most common problems are:
1. Loading unnecessary third-party scripts or heavy libraries.
2. Overusing client components and ignoring server-side rendering.
3. Skipping image optimization or font loading improvements.
4. Not monitoring Core Web Vitals.
Focus on critical pages first. These deliver the highest return on optimization efforts. Once they’re performing well, you can work on improvements across the rest of your site for a consistent user experience and strong Core Web Vitals.
Yes. The App Router in Next.js offers better performance improvements compared to the older Pages Router. It enables React Server Components, which reduce client-side JavaScript and improve hydration speed. It also introduces streaming, enhanced data fetching, and route-level caching, resulting in faster Time to First Byte (TTFB) and smoother interactivity.
The React Compiler automatically optimizes component rendering by analyzing dependencies and reducing unnecessary re-renders. Starting with Next.js 16, the compiler is stable and no longer experimental. It’s a simple yet powerful way to boost runtime performance without refactoring your existing components.
Use the @next/bundle-analyzer package to visualize your JavaScript bundles. Run ANALYZE=true npm run build to generate an interactive treemap showing every module in your build output and how much space it occupies. This makes it straightforward to identify oversized dependencies, spot libraries being imported more broadly than necessary, and find candidates for dynamic imports or lighter alternatives.
The most effective combination is Lighthouse for synthetic testing, WebPageTest for detailed waterfall analysis, and Chrome DevTools Performance tab for profiling specific interactions. For real user data, set up Real User Monitoring (RUM) through Vercel Analytics or a custom setup to track Core Web Vitals — INP, LCP, and CLS — against actual user sessions. Integrating Lighthouse CI into your deployment pipeline catches regressions before they reach production.
Use the built-in Next.js Image component, which handles format conversion, resizing, and lazy loading automatically. For above-the-fold images that affect LCP, set fetchPriority="high" to ensure the browser prioritizes them during loading. Configure the sizes prop to serve appropriately sized images for each viewport, and consider modern formats like WebP or AVIF where browser support allows — both deliver significantly smaller file sizes than JPEG or PNG at equivalent quality.
useCallback and useMemo in Next.js?Both hooks stabilize references across renders, but they serve different purposes. useCallback memoizes a function so its reference stays stable between renders — useful when passing callbacks to memoized child components. useMemomemoizes a computed value so it’s only recalculated when its dependencies change. Use them when you’ve identified unnecessary re-renders with the React Profiler, not as a default — applied indiscriminately, they add overhead without benefit.
Use static site generation (SSG) for pages where content doesn’t change per request — marketing pages, blog posts, documentation. It produces pre-built HTML served instantly from a CDN with no server processing on each request. Use server-side rendering (SSR) when pages need real-time or user-specific data that can’t be cached. For content that changes periodically but doesn’t need to be real-time, incremental static regeneration (ISR) gives you the performance benefits of SSG with automatic background updates.